Creating Customized Contour Plots with Labelled Points
I was asked to create a customized contour plot based on a chart (Fig 1 ) found in IEEE Transactions on Magnetics journal with some variant in requirements. The chart shows the areal density capacity (ADC) demo of certain samples on a bit density (BPI) by track density (TPI) chart. The two different contours shown in the plot are made up of ADC (BPI * TPI) and bit aspect ratio BAR (BPI/TPI).
A way to create the plot might be to generate the contours based on Excel and manually added in the different points. This proves to be too much work. Therefore, a simpler way is needed. Further requirements include having additional points (with labels) to be added in fairly easily and charts with different sets of data can be recreated rapidly.
Creating the Contours
The idea will be to use the regression plots for both the ADC and the BAR contours while the points and labels can be automatically added to the plots after reading from an Excel table (or csv file). The regression plots are based on seaborn lmplot and the points with labels are annotated on the chart based on the individual x, and y values.
Besides the seaborn, pandas, matplotlib and numpy, additional module adjustText is used to prevent overlapping of the text labels in the plot
import seaborn as sns
import pandas as pd
import numpy as np
import matplotlib.pyplot as plt
from adjustText import adjust_text

## Create GridLines for the ADC GBPSI
ADC_tgt = range(650,2150,50)
BPI_tgt = list(range(800,2700,20))*3
data_list = [ [ADC, BPI, ADC*1000/BPI] for BPI in BPI_tgt for ADC in ADC_tgt]
ADC_df = pd.DataFrame(data_list, columns=['Contour','X','Y']) #['ADC','TPI','BPI']
ADC_df['Contour'] = ADC_df['Contour'].astype('category')

## Create GridLines for the BAR
BAR_tgt =[1.0,1.5,2.0, 2.5,3.0,3.5,4.0,4.5,5.0,5.5,6.0,6.5]
BPI_tgt = list(range(800,2700,20))*3
data_list = [ [BAR, BPI, BPI/BAR] for BPI in BPI_tgt for BAR in BAR_tgt]
BAR_df = pd.DataFrame(data_list, columns=['Contour','X','Y']) #['BAR','TPI','BPI']
BAR_df['Contour'] = BAR_df['Contour'].astype('category')

combined_df = pd.concat([ADC_df,BAR_df])
Adding the demo points with text from Excel
The various points are updated in the excel sheet (or csv) , shown in fig 2, and read using pandas. Two data frames are produced, pts_df and text_df which is the dataframe from the points and the associated text. These, together with the contour data frame from above, are then feed into the seaborn lmplot. Note the points shown in the Excel and plots are randomly generated.
class ADC_DataPts():

    def __init__(self, xls_fname, header_psn = 0):
        self.xls_fname = xls_fname
        self.header_psn = header_psn
        self.data_df = pd.read_excel(self.xls_fname, header = self.header_psn)

    def generate_pts_text_df(self):
        pts_df = self.data_df['X Y Color'.split()]
        text_df = self.data_df['X_TxtPsn Y_TxtPsn TextContent'.split()]
        return pts_df, text_df

data_excel = r"yourexcelpath.xls"
adc_data = ADC_DataPts(data_excel, header_psn =1)
pts_df, text_df = adc_data.generate_pts_text_df()
Seaborn lmplot
The seaborn lmplot is used for the contours while the points are individually annotated on the graph
def generate_contour_plots_with_points(xlabel, ylabel, title):

    # overall settings for plots
    sns.set_context("talk")
    sns.set_style("whitegrid", \
                  {'grid.linestyle': ':', 'xtick.bottom': True, 'xtick.direction': 'out',\
                    'xtick.color': '.15','axes.grid' : False}
                 )

    # Generate the different "contour"
    g = sns.lmplot("X", "Y", data=combined_df, hue='Contour', order =2, \
               height =7, aspect =1.5, ci =False, line_kws={'color':'0.9', 'linestyle':':'}, \
                scatter=False, legend_out =False)

    # Bold the key contour lines
    for n in [1.0,2.0,3.0]:
        sub_bar = BAR_df[BAR_df['Contour']==n]
        #generate the bar contour
        g.map(sns.regplot, x= "X", y="Y", data=sub_bar ,scatter= False, ci =False, \
              line_kws={'color':'0.9', 'linestyle':'-', 'alpha':0.05, 'linewidth':'3'})

    for n in [1000,1500,2000]:
        sub_adc = ADC_df[ADC_df['Contour']==n]
        #generate the bar contour
        g.map(sns.regplot, x= "X", y="Y", data=sub_adc ,scatter= False, ci =False, order =2, \
              line_kws={'color':'0.9', 'linestyle':'-', 'alpha':0.05, 'linewidth':'3'})#'color':'0.7', 'linestyle':'-', 'alpha':0.05, 'linewidth':'2'

    # Generate the different points
    for index, rows in pts_df.iterrows():
        g = g.map_dataframe(plt.plot, rows['X'], rows['Y'], 'o',  color = rows['Color'])# generate plot with differnt color or use annotation?

    ax = g.axes.flat[0]

    # text annotation on points
    style = dict(size=12, color='black', verticalalignment='top')
    txt_grp = []
    for index, rows in text_df.iterrows():
        txt_grp.append(ax.text( rows['X_TxtPsn'], rows['Y_TxtPsn'], rows['TextContent'], **style) )#how to find space, separate data base

    style2 = dict(size=12, color='grey', verticalalignment='top')
    style3 = dict(size=12, color='grey', verticalalignment='top', rotation=30, alpha= 0.7)

    # Label the key contours
    ax.text( 2400, 430, '1000 Gfpsi', **style2)
    ax.text( 2400, 640, '1500 Gfpsi', **style2)
    ax.text( 2400, 840, '2000 Gfpsi', **style2)

    ax.text( 1100, 570, 'BAR 2.0', **style3)
    ax.text( 1300, 460, 'BAR 3.0', **style3)

    # Set x y limit
    ax.set_ylim(400,1000)
    ax.set_xlim(1000,2600)

    # Set general plot attributes
    g.set_xlabels(xlabel)
    g.set_ylabels(ylabel)
    plt.title(title)

    adjust_text(txt_grp, x = pts_df.X.tolist() , y = pts_df.Y.tolist() , autoalign = True, expand_points=(1.4, 1.4))

generate_contour_plots_with_points('kBPI', 'kTPI', "DEMO Areal Density Capability\n")
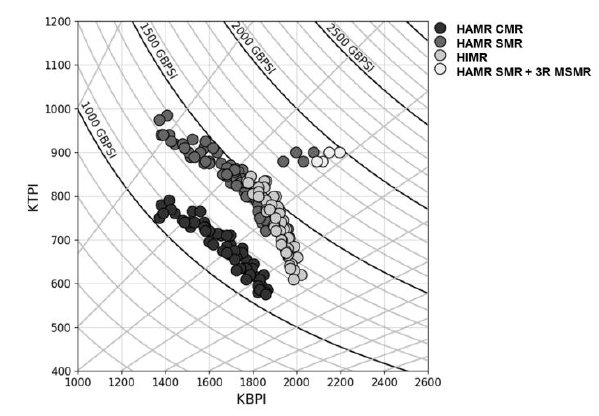
Fig 1: Sample plot from Heat-Assisted Interlaced Magnetic Recording IEEE Vol 54 No2
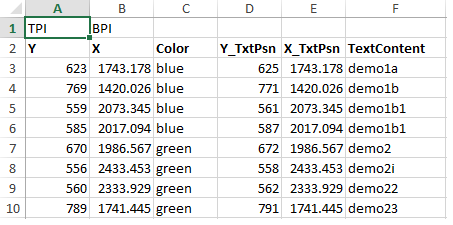
Fig2: Excel tables with associated demo points, the respective color and the text labels
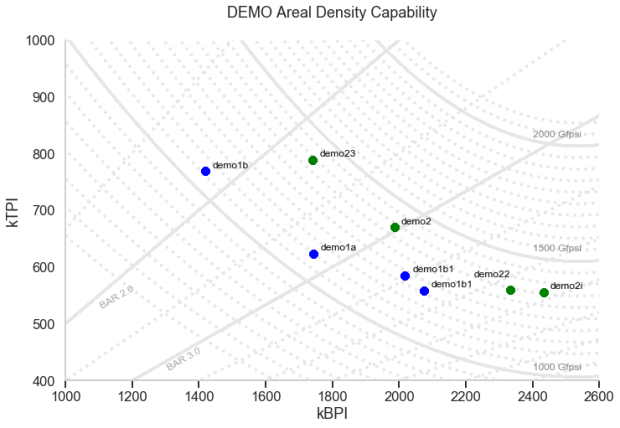
Fig 3: Generated chart with the ADC and BAR contours and demo pts with labels
