Month: November 2018

Heap Map for discrepancy check

Monitoring counts discrepancy

In one aspect of my work, we have a group of samples undergoing several rounds of modifications with same set of tests being performed at each round. For each test, parameters for each sample are collected. For some samples, a particular test may fail in certain rounds resulting in no/missing parameters being collected for that test.

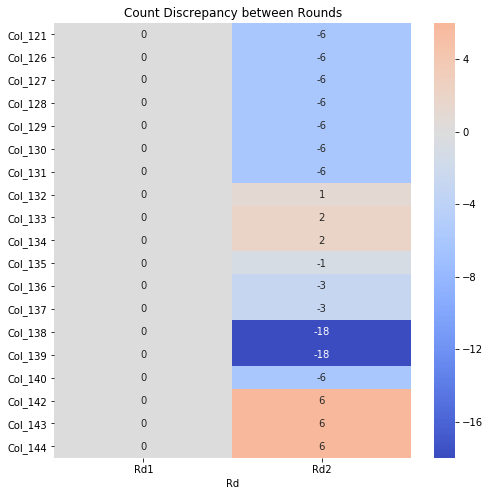
When we compare the performance of the samples especially grouping as a mean, missing parameters from certain samples at certain rounds may skew the results. To ensure accuracy, we need to ensure matching samples data. As there are multiple tests and few hundreds parameters being tracked, we need a way to keep track of the parameters that have mismatch parameters between rounds.

A simple way will be to use the heat map to highlight parameters that have discrepancy in number of counts (this will mean that some samples are missing in data) between rounds. The script is generated using mainly Pandas and Seaborn.

Steps

  1. Group the counts for each parameter for each round.
  2. Use one round as reference (default 1st round), take the differences in counts for each parameter for each round.
  3. Display as heat map for only rounds that have discrepancy.
import os, sys, datetime, re
import pandas as pd
import numpy as np
import seaborn as sns
import matplotlib.pyplot as plt

# retrieve zone data
rawfile = 'raw_data.csv'
raw_df = pd.read_csv(rawfile)

# count of data in group
cnt_df = raw_df.groupby(['round']).count()

# Substract the first to the rest
diff_df = cnt_df.subtract(cnt_df.iloc[0], axis = 1)

# drop columns where it is all zeros, meaning exclude data that are matched.
diff_df.loc[:, diff_df.any()]

fig, ax = plt.subplots(figsize=(10,10))  

sns.heatmap(diff_df.loc[:, diff_df.any()].T,  xticklabels=True, yticklabels=True, ax =ax , annot=True, fmt="d", center= 0 ,  cmap="coolwarm")
plt.tight_layout()

Untitled

Extra

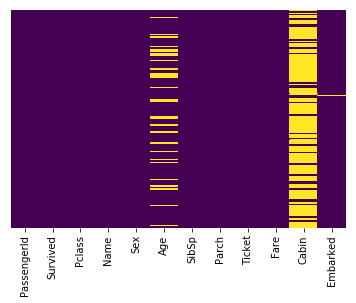
Quick view of missing data using seaborn heatmap


sns.heatmap(df.isnull(), yticklabels=False, cbar = False, cmap = 'viridis')

missingdata

Hosting static website with GitHub Pages

Create static website with custom domain names. Perks is having your own web hosting at minimal cost. The only cost is the cost of the custom domain name.

Requirements:

  1. Github account: For hosting the static website.
  2. Custom domain name: Purchase domain names from GoDaddy or Namecheap etc. Alternatively, can use GitHub default url <username>.github.io

Steps:

  1. Github
    1. Create new repository with following format <username>.github.io where username refers to GitHub userid.
    2. In the repository, go to setting: Under Theme, choose a Jekyll theme. When finish, click on Source, select master branch. A file needs to exist in repository before Source option can be selected.
    3. If you have purchase your custom domain, you need to configure the A records and CNAME for the domain at the registrar to point to the GitHub site. Proceed to make the necessary changes at the domain registrar website.
  2. Registrar (Below is using GoDaddy as example)
    1. Under My Products, select the domain name that will be used. Click on Manage button.
    2. Once in setting page, scroll down to Additional Settings and click Manage DNS
    3. Within the DNS management page, Add in 4 “A” row with each pointing to IP as follows:
      1. 185.199.108.153
      2. 185.199.109.153
      3. 185.199.110.153
      4. 185.199.111.153
    4. Add in the CNAME pointing to your repository at Github: <username>.github.io
    5. View link for more info on configuring domain name with goDaddy
    6. Similarly, see following link for Namecheap
    7. Note: if you setup using A records and CNAME, leave the nameservers as default.
    8. Once the settings are configured, return to GitHub pages to add the custom domain name
  3. Github
    1. At the setting page, add the custom domain name in the Custom Domain section.
    2. Tick Enforce Https (may take up to 24 hours to take effect)
    3. Completed.
  4. Proceed to add in contents in GitHub using markdown.

Resources

Notes

  • GoDaddy default A records: 50.63.202.32


Radix Sort in Python

Background

  1. Non comparison integer sorting by grouping numbers based on individual digits or radix (base)
  2. Perform iteratively from least significant digit (LSD) to most significant digit (MSD) or recusively from MSD to LSD.
  3. At each iteration, sorting of target digit is based usually on Counting sort as subroutine.
  4. Complexity: O(d*n+b)) where b is the base for representing numbers eg 10. d is the number of digits. Close to Linear time if d is constant amount

Counting Sort as subroutine

  • Recap on the counting sort. See Counting Sort in Python for more info
  • Taking “get_sortkey ” function that generate the keys based on objects characteristics.
  • Modified the get_sortkey function to perform radix sort.
import random, math

def get_sortkey(n):
    """ Define the method to retrieve the key """
    return n

def counting_sort(tlist, k, get_sortkey):
    """ Counting sort algo with sort in place.
        Args:
            tlist: target list to sort
            k: max value assume known before hand
            get_sortkey: function to retrieve the key that is apply to elements of tlist to be used in the count list index.
            map info to index of the count list.
        Adv:
            The count (after cum sum) will hold the actual position of the element in sorted order
            Using the above, 

    """

    # Create a count list and using the index to map to the integer in tlist.
    count_list = [0]*(k)

    # iterate the tgt_list to put into count list
    for n in tlist:
        count_list[get_sortkey(n)] = count_list[get_sortkey(n)] + 1  

    # Modify count list such that each index of count list is the combined sum of the previous counts
    # each index indicate the actual position (or sequence) in the output sequence.
    for i in range(k):
        if i ==0:
            count_list[i] = count_list[i]
        else:
            count_list[i] += count_list[i-1]

    output = [None]*len(tlist)
    for i in range(len(tlist)-1, -1, -1):
        sortkey = get_sortkey(tlist[i])
        output[count_list[sortkey]-1] = tlist[i]
        count_list[sortkey] -=1

    return output

Radix sort with up to 3-digits numbers

  • Replace the get_sortkey with the get_sortkey2 which extract the integer based on the digit place and uses the counting sort at each iteration
# radix sort
from functools import partial

def get_sortkey2(n, digit_place=2):
    """ Define the method to retrieve the key
        return the key based on the digit place. Current set base to 10
    """
    return (n//10**digit_place)%10

## Create random list for demo counting sort.
random.seed(1)
tgt_list = [random.randint(20,400) for n in range(10)]
print("Unsorted List")
print(tgt_list)

## Perform the counting sort.
print("\nSorted list using counting sort")

output = tgt_list
for n in range(3):
    output = counting_sort(output, 30, partial(get_sortkey2, digit_place=n))
    print(output)

## output
# Unsorted List
# [88, 311, 52, 150, 80, 273, 250, 261, 353, 214]

# Sorted list using counting sort
# [150, 80, 250, 311, 261, 52, 273, 353, 214, 88]
# [311, 214, 150, 250, 52, 353, 261, 273, 80, 88]
# [52, 80, 88, 150, 214, 250, 261, 273, 311, 353]

See also:

Resources:

  1. Getting To The Root Of Sorting With Radix Sort

Convert PDF pages to text with python

A simple guide to text from PDF. This is an extension of the Convert PDF pages to JPEG with python post

  1. Objectives:
      1. Extract text from PDF
  2. Required Tools:
      1. Poppler for windows— Poppler is a PDF rendering library . Include the pdftoppm utility
      2. Poppler for Mac — If HomeBrew already installed, can use brew install Poppler
      3. pdftotext— Python module. Wraps the poppler pdftotext utility to convert PDF to text.
  3. Steps:
      1. Install Poppler. For windows, Add “xxx/bin/” to env path
      2. pip install pdftotext

Usage (sample code from pdftotext github)

import pdftotext

# Load your PDF
with open("Target.pdf", "rb") as f:
    pdf = pdftotext.PDF(f)

# Save all text to a txt file.
with open('output.txt', 'w') as f:
    f.write("\n\n".join(pdf))

Further notes 

See also:

Convert PDF pages to JPEG with python

A simple guide to extract images (jpeg, png) from PDF.

  1. Objectives:
      1. Extract Images from PDF
  2. Required Tools:
      1. Poppler for windows— Poppler is a PDF rendering library . Include the pdftoppm utility
      2. Poppler for Mac — If HomeBrew already installed, can use brew install Poppler
      3. Pdf2image— Python module. Wraps the pdftoppm utility to convert PDF to a PIL Image object.
  3. Steps:
      1. Install Poppler. For windows, Add “xxx/bin/” to env path
      2. pip install pdf2image

Usage

import os
import tempfile
from pdf2image import convert_from_path

filename = 'target.pdf'

with tempfile.TemporaryDirectory() as path:
     images_from_path = convert_from_path(filename, output_folder=path, last_page=1, first_page =0)

base_filename  =  os.path.splitext(os.path.basename(filename))[0] + '.jpg'      

save_dir = 'your_saved_dir'

for page in images_from_path:
    page.save(os.path.join(save_dir, base_filename), 'JPEG')

Further notes 

Counting Sort in Python

Background

  1. Sort a collection of objects according to integer keys. Count the number of objects belonging to a specific key value and output the sequence based on both integer key sequence + number of counts in each key.
  2. Running time linear: O(n+k) where n is the number of objects and k is the number of keys.
  3. Keys should not be significant larger than number of objects

Basic Counting Sort

  • With objects as integer key itself.
  • Limited use. Index key not able to modify for extended cases.
import random, math

def basic_counting_sort(tlist, k):
    """ Counting sort algo. Modified existing list. Only for positive integer.
        Args:
            tlist: target list to sort
            k: max value assume known before hand
        Disadv:
            It only does for positive integer and unable to handle more complex sorting (sort by str, negative integer etc)
            It straight away retrieve all data from count_list using count_list index as its ordering.
            Do not have the additional step to modify count_list to capture the actual index in output.
    """

    # Create a count list and using the index to map to the integer in tlist.
    count_list = [0]*(k)

    # loop through tlist and increment if exists
    for n in tlist:
        count_list[n] = count_list[n] + 1

    # Sort in place, copy back into original list
    i=0
    for n in range(len(count_list)):
        while count_list[n] > 0:
            tlist[i] = n
            i+=1
            count_list[n] -= 1

## Create random list for demo counting sort.
random.seed(0)
tgt_list = [random.randint(0,20) for n in range(10)]
print("Unsorted List")
print(tgt_list)

## Perform the counting sort.
print("\nSorted list using basic counting sort")
basic_counting_sort(tgt_list, max(tgt_list)+1)
print(tgt_list)

Counting sort — improved version

  • Taking “get_sortkey ” function that generate the keys based on objects characteristics.
  • Currently, function just return the object itself to work in same way as above but the function can be modified to work with other form of objects e.g. negative integers, string etc.
import random, math

def get_sortkey(n):
    """ Define the method to retrieve the key """
    return n

def counting_sort(tlist, k, get_sortkey):
    """ Counting sort algo with sort in place.
        Args:
            tlist: target list to sort
            k: max value assume known before hand
            get_sortkey: function to retrieve the key that is apply to elements of tlist to be used in the count list index.
            map info to index of the count list.
        Adv:
            The count (after cum sum) will hold the actual position of the element in sorted order
            Using the above, 

    """

    # Create a count list and using the index to map to the integer in tlist.
    count_list = [0]*(k)

    # iterate the tgt_list to put into count list
    for n in tlist:
        count_list[get_sortkey(n)] = count_list[get_sortkey(n)] + 1  

    # Modify count list such that each index of count list is the combined sum of the previous counts
    # each index indicate the actual position (or sequence) in the output sequence.
    for i in range(k):
        if i ==0:
            count_list[i] = count_list[i]
        else:
            count_list[i] += count_list[i-1]

    output = [None]*len(tlist)
    for i in range(len(tlist)-1, -1, -1):
        sortkey = get_sortkey(tlist[i])
        output[count_list[sortkey]-1] = tlist[i]
        count_list[sortkey] -=1

    return output

## Create random list for demo counting sort.
random.seed(0)
tgt_list = [random.randint(0,20) for n in range(10)]
print("Unsorted List")
print(tgt_list)

## Perform the counting sort.
print("\nSorted list using basic counting sort")
output = counting_sort(tgt_list, max(tgt_list) +1, get_sortkey) # assumption is known the max value in tgtlist  for this case.
print(output)

Simple illustration: Counting sort use for negative numbers

def get_sortkey2(n):
    """ Define the method to retrieve the key
        Shift the key such that the all keys still positive integers
        even though input may be negative
    """
    return n +5

## Create random list for demo counting sort.
random.seed(1)
tgt_list = [random.randint(-5,20) for n in range(10)]
print("Unsorted List")
print(tgt_list)

## Perform the counting sort.
print("\nSorted list using counting sort")
output = counting_sort(tgt_list, 30, get_sortkey2)
print(output)<span id="mce_SELREST_start" style="overflow:hidden;line-height:0;"></span>
Sorry, something went wrong. Reload?
Sorry, we cannot display this file.
Sorry, this file is invalid so it cannot be displayed.

Resources:

  1. https://www.geeksforgeeks.org/counting-sort/

Setup MongoDB on iOS

A simple guide to setting up MongoDB on iOS.

  1. Objectives:
      1. Install MongoDB on MacBook.
  2. Required Tools:
      1. Homebrew —  package manager for Mac
      2. MongoDB — MongoDB community version
      3. pymongo — python API for MongoDB.
  3. Steps (terminal command in blue):
      1. brew update
      2. brew install mongodb
      3. Create MongoDB Data directory (/data/db) with updated permission
        1. $ sudo mkdir -p /data/db
        2. $ sudo chown <user>/data/db
      4. Create/open bash_profile
        1. $ cd to users/<username>
        2. $ touch .bash_profile # skip if .bash_profile present
        3. $ open .bash_profile
      5. Insert command in  bash_profile for MongoDB commands to work in terminal
        1. export MONGO_PATH=/usr/local/mongodb
        2. export PATH=$PATH:$MONGO_PATH/bin
      6. Test: Run MongoDB
        1. terminal 1: mongod
        2. terminal 2: mongo.
      7. Install pymongo
        1. pip install pymongo

Further notes 

Fast Install Python Virtual Env in Windows

A simple guide to install virtual environment with different python version on Windows.

  1. Objectives:
      1. Install Virtual Environment on Windows
  2. Required Tools:
      1. Python —  Python 3 chosen in this case.
      2. VirtualEnv — Main virtualenv tool.
      3. VirtualEnvWrapper-Win — VirtualEnv Wrapper for Windows.
  3. Steps:
      1. Install python with python windows installer.
      2. Add python path to Windows PATH. Python 3 will enable this option for users. If not found, add the following two path (Python 3 sample default path )
        1. C:\Users\\AppData\Local\Programs\Python\Python36
        2. C:\Users\MyUserName\AppData\Local\Programs\Python\Python36\Scripts
      3. pip install virtualenv
      4. pip install virtualenvwrapper-win
      5. Main commands use with virtualenv wrapper in windows command prompt
        1. mkvirtualenv : create a new virtual env
        2. workon : list all the environment created
        3. workon  : Activate particular environment.
        4. deactivate: deactivate active environment
        5. rmvirtualenv : remove target environment.

Further notes 

  • Most of the guide reference from Timmy Reilly’s Blog.
  • To create virtualenv with specified python version
    • virtualenv -p <path/win dir of python version>
    • mkvirtualenv -p <path/win dir of python version>
  • Retrieve a list of python modules installed via pip and save to requirement.txt
    • pip freeze > requirement.txt
  • to install a list of required modules (from other virtual env etc)
    • pip install -r requirements.txt
  • Likely python3 pip path for win10: C:\Users\xxx\AppData\Local\Programs\Python\Python39\Scripts