automation

Easy Web Scraping with Google Sheets

Google sheets simplify the process of web scraping especially for table and list elements. For below project, the purpose is to obtain common/essential words and their corresponding definitions for GMAT/GRE preparations.

Below are examples of each.

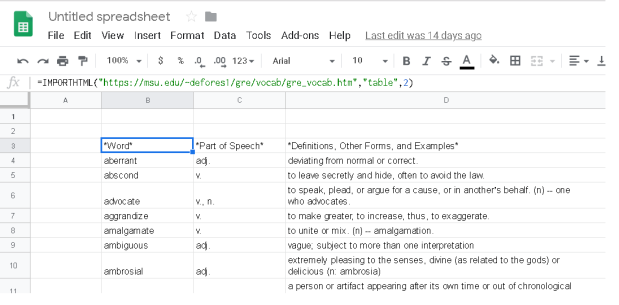
Table type extraction (source)

In one of the cells, type in =IMPORTHTML(url-site,“table”,<table_id>) where <table_id> is the table position in the url (either guess or iterate from 1 to XXX etc or use chrome developer tools to count the table num)  

tabletypeexample

tabletypeexamplegooglesheet


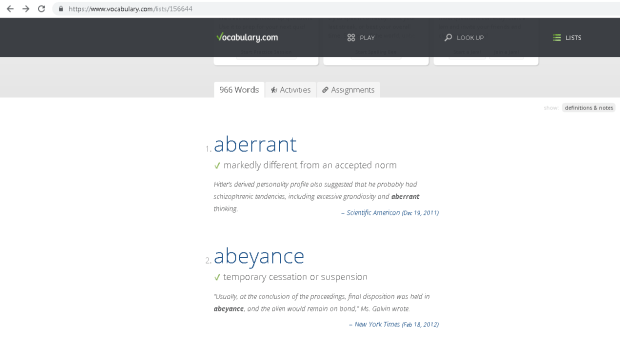
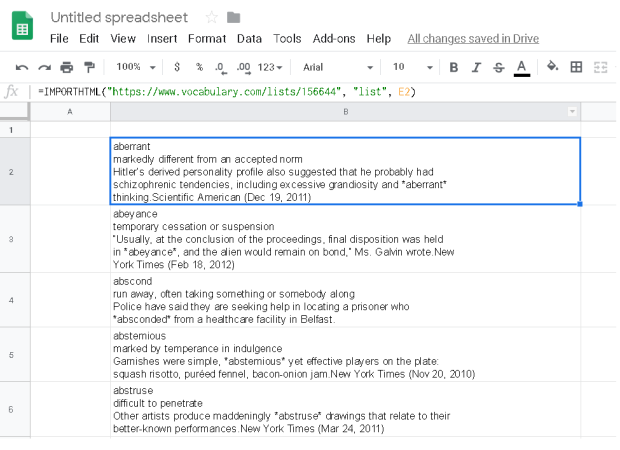
List Type Extraction (source)

In one of the cells, type in =IMPORTHTML(url-site,“list”,<list_id>) where <list_id> is the list order in the url (either guess or iterate from 1 to XXX etc or use chrome developer tools to count the list num)  

listtypeexamplegooglesheet

listtypeexamplegooglesheet1

The above techniques can also apply to other websites that have list or table elements. For this project, one of the next step is to create flash cards video to help in the learning. With the table format in google sheets, it is easy to download the whole list or table as .CSV file and create in the form of flash cards. Check the link for the quick project.


PDF manipulation with Python

This post covers basic PDF manipulation for daily tasks using simple Python modules.

  1. Merging mulitple PDF
  2. Extract text from PDF
  3. Extract image from PDF

Merging PDF

from PyPDF2 import PdfFileMerger
pdfs = ['a.pdf', b.pdf]
merger = PdfFileMerger()

for pdf in pdfs:
    merger.append(pdf)

merger.write("output.pdf")

Extract text from PDF

import pdftotext

# Load your PDF
with open("Target.pdf", "rb") as f:
    pdf = pdftotext.PDF(f)

# Save all text to a txt file.
with open('output.txt', 'w') as f:
    f.write("\n\n".join(pdf))

More information from “Convert PDF pages to text with python

Extract Image (JPEG) from PDF


import os
import tempfile
from pdf2image import convert_from_path

filename = 'target.pdf'

with tempfile.TemporaryDirectory() as path:
     images_from_path = convert_from_path(filename, output_folder=path, last_page=1, first_page =0)

base_filename  =  os.path.splitext(os.path.basename(filename))[0] + '.jpg'      

save_dir = 'your_saved_dir'

for page in images_from_path:
    page.save(os.path.join(save_dir, base_filename), 'JPEG')

More information from “Convert PDF pages to JPEG with python

Running R on Jupyter Notebook with R Kernel (No Anaconda)

A simple guide to install R Kernel on Jupyter Notebook (Windows).  Do not need Anaconda.

  1. Objectives:
      1. Install R Kernel on Jupyter Notebook (Windows)
  2. Required Tools:
      1. R for windows— R for windows
      2. JupyterNotebook — Jupyter Notebook
  3. Steps:
      1. Install R. Use the R terminal (do not use R studio) to install R packages:
        • install.packages(c(‘repr’, ‘IRdisplay’, ‘evaluate’, ‘crayon’, ‘pbdZMQ’, ‘devtools’, ‘uuid’, ‘digest’))
        • install.packages(‘IRkernel’)
      2. Make Kernel available to Jupyter
        • IRkernel::installspec()
        • OR IRkernel::installspec(user = FALSE) #install system-wide
      3. Open a notebook and open new R script.

Further notes 

  • After getting Additional R library might be hard to install inside the Notebook. For workaround, install desired library in R terminal then open the Notebook.
  • If need to use R.exe on windows command terminal, ensure R.exe is on path. [likely location: C:\R\R-2.15.1\bin]
  • ggplot tutorial

References:

Retrieving Stock statistics from Yahoo Finance using python

For this post, we are only going to scrape the “Key Statistics” page of a particular stock in Yahoo Finance. The usual way might be to use Requests and BeautifulSoup to parse the web page. However, with the table format in the targeted webpage, it is easier to use Pandas read_html and DataFrame function.

  1. Objectives:
      1. Retrieving stocks information (Key statistics) from Yahoo Finance.
  2. Required Tools:
      1. Python Pandas—  Using Pandas read_html function for reading web table form.

Usage — Pulling a particular stock data data

import pandas as pd

tgt_website = r'https://sg.finance.yahoo.com/quote/WDC/key-statistics?p=WDC'

def get_key_stats(tgt_website):

    # The web page is make up of several html table. By calling read_html function.
    # all the tables are retrieved in dataframe format.
    # Next is to append all the table and transpose it to give a nice one row data.
    df_list = pd.read_html(tgt_website)
    result_df = df_list[0]

    for df in df_list[1:]:
        result_df = result_df.append(df)

    # The data is in column format.
    # Transpose the result to make all data in single row
    return result_df.set_index(0).T

# Save the result to csv
result_df = get_key_stats(tgt_website)

Pulling all the stocks symbols

Here, we are pulling one known stock symbol. To get all the stocks in particular indices, the stock symbols need to be known first. The below code will extract all the stock symbols, along with other data, from the NASDAQ website. [Note: the NASDAQ website has changed format and the original method of getting the stock symbols is not valid. Please see the 2nd method to pull from eoddata website]

import pandas as pd

weblink = 'https://www.nasdaq.com/screening/companies-by-name.aspx?letter=A&render=download'
sym_df = pd.read_csv(weblink)
stock_symbol_list = sym_df.Symbol.tolist()

import string
import time
import pandas as pd

url_template = 'http://eoddata.com/stocklist/NASDAQ/{}.htm'

sym_df = pd.DataFrame()
for letter in list(string.ascii_uppercase):
    tempurl = url_template.format(letter)
    temp_data = pd.read_html(tempurl)
    temp_df = temp_data[4]
    if len(sym_df)==0:
        sym_df = temp_df
    else:
        sym_df = sym_df.append(temp_df)
    time.sleep(1)
stock_symbol_list = sym_df.Code.tolist()

Pulling key statistics for all stock symbols (for given index)

The last step will be to iterate all the symbols and get the corresponding key statistcis

all_result_df = pd.DataFrame()
url_prefix = 'https://sg.finance.yahoo.com/quote/{0}/key-statistics?p={0}'
for sym in stock_symbol_list:
    stock_url = url_prefix.format(sym)
    result_df = get_key_stats(stock_url)
    if len(all_result_df) ==0:
        all_result_df = result_df
    else:
        all_result_df = all_result_df.append(result_df)

# Save all results
all_result_df.to_csv('results.csv', index =False)

Monitoring quality over time with heap map

A particular concern with testing hard disk drives over multiple times is the quality of certain drives may degrade (wear and tear) over time and we failed to detect this degradation.

We have certain metrics to gauge any degradation symptom observed for a particular head in a particular drive. For example, with metric A, we are looking at the % change over time reference to the date of the first test o determine whether a head is degraded.

Below python code will base on the following table to generate the required heatmap for easy visualization.

untitled

Calculating %Change

import seaborn as sns
import numpy as np
import pandas as pd
import matplotlib.pyplot as plt

df1['DATE1'] = df1.DATE.dt.strftime('%m/%d/%Y')
df1 = df1.sort_values(by = 'DATE1')

# calculate the metric % change and
# actual change with reference to each individual head first data

df1['METRIC_A_PCT_CHANGE'] = df1.groupby(['SERIAL','HEAD'])['METRIC_A']\
                            .apply(lambda x: x.div(x.iloc[0]).subtract(1).mul(100))
df1['METRIC_A_CHANGE'] = df1.groupby(['SERIAL','HEAD'])['METRIC_A']\
                         .apply(lambda x: x - x.iloc[0])

Plotting in HeapMap

fig, ax = plt.subplots(figsize=(10,10))

# Pivot it for plotting in heap map
ww = df1.pivot_table(index = ['SERIAL','HEAD'], \
                     columns = 'DATE1', values = "METRIC_A_PCT_CHANGE")

g = sns.heatmap(ww, vmin= -5, vmax = 5, center = 0, \
                cmap= sns.diverging_palette(220, 20, sep=20, as_cmap=True),\
                xticklabels=True, yticklabels=True, \
                ax = ax, linecolor = 'white', linewidths = 0.1, annot = True)

g.set_title("% METRIC_A changes over multiple Dates", \
            fontsize = 16, color = 'blue')


Generated Plots

From the heap map, SER_3BZ-0 have some indication of degradation with increasing % Metric A loss over the different test date.

untitled

Notes

  • Getting the % percentage change relative to first value of each group.
    • df.groupby(‘security’)[‘price’].apply(lambda x: x.div(x.iloc[0]).subtract(1).mul(100))


Downloading YouTube Videos and converting to MP3

A simple guide to download videos from YouTube using python

  1. Objectives:
      1. Download YouTube Videos
      2. Saving as subclip (saving a portion of the video)
      3. Converting to MP3
      4.  
  2. Required Tools:
      1. PyTube— primarily for downloading youtube videos.
      2. MoviePy — for video editing and also convert to mp3.
      3.  
  3. Steps:
    1. pip install pytube and moviepy

Basic Usage

from pytube import YouTube
from moviepy.editor import *

# download a file from youtube
youtube_link = 'https://www.youtube.com/watch?v=yourtubevideos'
w = YouTube(youtube_link).streams.first()
w.download(output_path="/your/target/directory")

# download a file with only audio, to save space
# if the final goal is to convert to mp3
youtube_link = 'https://www.youtube.com/watch?v=targetyoutubevideos'
y = YouTube(youtube_link)
t = y.streams.filter(only_audio=True).all()
t[0].download(output_path="/your/target/directory")

Downloading videos from a YouTube playlist

import requests
import re
from bs4 import BeautifulSoup

website = 'https://www.youtube.com/playlist?list=yourfavouriteplaylist'
r= requests.get(website)
soup = BeautifulSoup(r.text)

tgt_list = [a['href'] for a in soup.find_all('a', href=True)]
tgt_list = [n for n in tgt_list if re.search('watch',n)]

unique_list= []
for n in tgt_list:
    if n not in unique_list:
        unique_list.append(n)

# all the videos link in a playlist
unique_list = ['https://www.youtube.com' + n for n in unique_list]

for link in unique_list:
    print(link)
    y = YouTube(link)
    t = y.streams.all()
    t[0].download(output_path="/your/target/directory")

Converting from MP4 to MP3 (from a folder with mp4 files)

import moviepy.editor as mp
import re
tgt_folder = "/folder/contains/your/mp4"

for file in [n for n in os.listdir(tgt_folder) if re.search('mp4',n)]:
full_path = os.path.join(tgt_folder, file)
output_path = os.path.join(tgt_folder, os.path.splitext(file)[0] + '.mp3')
clip = mp.AudioFileClip(full_path).subclip(10,) # disable if do not want any clipping
clip.write_audiofile(output_path)

Convert PDF pages to text with python

A simple guide to text from PDF. This is an extension of the Convert PDF pages to JPEG with python post

  1. Objectives:
      1. Extract text from PDF
  2. Required Tools:
      1. Poppler for windows— Poppler is a PDF rendering library . Include the pdftoppm utility
      2. Poppler for Mac — If HomeBrew already installed, can use brew install Poppler
      3. pdftotext— Python module. Wraps the poppler pdftotext utility to convert PDF to text.
  3. Steps:
      1. Install Poppler. For windows, Add “xxx/bin/” to env path
      2. pip install pdftotext

Usage (sample code from pdftotext github)

import pdftotext

# Load your PDF
with open("Target.pdf", "rb") as f:
    pdf = pdftotext.PDF(f)

# Save all text to a txt file.
with open('output.txt', 'w') as f:
    f.write("\n\n".join(pdf))

Further notes 

See also:

Convert PDF pages to JPEG with python

A simple guide to extract images (jpeg, png) from PDF.

  1. Objectives:
      1. Extract Images from PDF
  2. Required Tools:
      1. Poppler for windows— Poppler is a PDF rendering library . Include the pdftoppm utility
      2. Poppler for Mac — If HomeBrew already installed, can use brew install Poppler
      3. Pdf2image— Python module. Wraps the pdftoppm utility to convert PDF to a PIL Image object.
  3. Steps:
      1. Install Poppler. For windows, Add “xxx/bin/” to env path
      2. pip install pdf2image

Usage

import os
import tempfile
from pdf2image import convert_from_path

filename = 'target.pdf'

with tempfile.TemporaryDirectory() as path:
     images_from_path = convert_from_path(filename, output_folder=path, last_page=1, first_page =0)

base_filename  =  os.path.splitext(os.path.basename(filename))[0] + '.jpg'      

save_dir = 'your_saved_dir'

for page in images_from_path:
    page.save(os.path.join(save_dir, base_filename), 'JPEG')

Further notes 

Setup MongoDB on iOS

A simple guide to setting up MongoDB on iOS.

  1. Objectives:
      1. Install MongoDB on MacBook.
  2. Required Tools:
      1. Homebrew —  package manager for Mac
      2. MongoDB — MongoDB community version
      3. pymongo — python API for MongoDB.
  3. Steps (terminal command in blue):
      1. brew update
      2. brew install mongodb
      3. Create MongoDB Data directory (/data/db) with updated permission
        1. $ sudo mkdir -p /data/db
        2. $ sudo chown <user>/data/db
      4. Create/open bash_profile
        1. $ cd to users/<username>
        2. $ touch .bash_profile # skip if .bash_profile present
        3. $ open .bash_profile
      5. Insert command in  bash_profile for MongoDB commands to work in terminal
        1. export MONGO_PATH=/usr/local/mongodb
        2. export PATH=$PATH:$MONGO_PATH/bin
      6. Test: Run MongoDB
        1. terminal 1: mongod
        2. terminal 2: mongo.
      7. Install pymongo
        1. pip install pymongo

Further notes 

Fast Install Python Virtual Env in Windows

A simple guide to install virtual environment with different python version on Windows.

  1. Objectives:
      1. Install Virtual Environment on Windows
  2. Required Tools:
      1. Python —  Python 3 chosen in this case.
      2. VirtualEnv — Main virtualenv tool.
      3. VirtualEnvWrapper-Win — VirtualEnv Wrapper for Windows.
  3. Steps:
      1. Install python with python windows installer.
      2. Add python path to Windows PATH. Python 3 will enable this option for users. If not found, add the following two path (Python 3 sample default path )
        1. C:\Users\\AppData\Local\Programs\Python\Python36
        2. C:\Users\MyUserName\AppData\Local\Programs\Python\Python36\Scripts
      3. pip install virtualenv
      4. pip install virtualenvwrapper-win
      5. Main commands use with virtualenv wrapper in windows command prompt
        1. mkvirtualenv : create a new virtual env
        2. workon : list all the environment created
        3. workon  : Activate particular environment.
        4. deactivate: deactivate active environment
        5. rmvirtualenv : remove target environment.

Further notes 

  • Most of the guide reference from Timmy Reilly’s Blog.
  • To create virtualenv with specified python version
    • virtualenv -p <path/win dir of python version>
    • mkvirtualenv -p <path/win dir of python version>
  • Retrieve a list of python modules installed via pip and save to requirement.txt
    • pip freeze > requirement.txt
  • to install a list of required modules (from other virtual env etc)
    • pip install -r requirements.txt
  • Likely python3 pip path for win10: C:\Users\xxx\AppData\Local\Programs\Python\Python39\Scripts