Author: Kok Hua

Getting historical financial statistics of stock using python

Morningstar.com provides useful information of stocks particularly financial ratio such as EPS, P/E etc breakdown to span of several years. It also provides an option for user to export all the data to a .csv file. This can be achieved by pressing the “export” button on the particular stock page. However, if there is a need to retrieve a series of stock data, users will have to visit the corresponding stock page and download the data one by one.

MorningStar

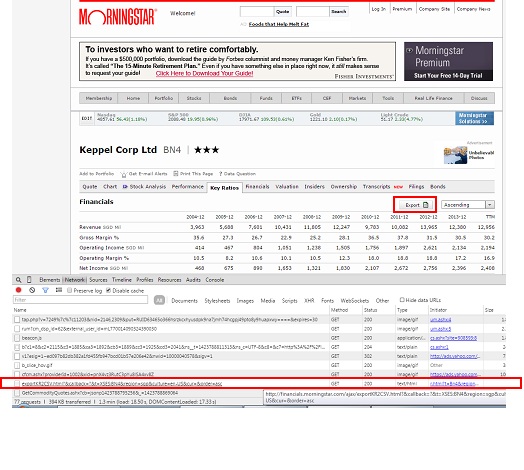
Below post is one way to retrieve the historical financial data of all target stocks. The first step will be to obtain the request url to activate the download without physically pressing the “export” button. To obtain the url, you can use the developer tools under Chrome web browser, press the network tab and monitor the ALL tab. Once the export button is pressed, the ALL tab will display the url corresponding to the request send. Example fo the url use for the request is as followed:

http://financials.morningstar.com/ajax/exportKR2CSV.html?&callback=?&t=XSES:N4E&region=sgp&culture=en-US&cur=&order=asc

The blue section is the stock symbol. By changing the stock symbol, we can use the same url to retrieve all the financial data for different stocks. The url formation will be similar to what is mentioned in previous posts and the downloading can be achieved using python pattern module. After downloading the .csv file, the data can be post processed using python pandas.

Normally, the data will be easier to process if the data can be made into a Pandas Dataframe object which will then be used for joining and transforming purpose. However, the raw data downloaded (one csv for each stock) has all the headers in the first column instead of along the rows so we would need to transpose the data set. However, once transpose, the pandas will not be able to take care of columns that are non-unique. It can handle duplicate columns easily the moment it read from a csv file so the easy way is to re-write the transpose data back to the same file and read back the data again. Once read back using the Pandas.read_csv function, the result will be a dataframe object with the duplicate columns being taken care of. The columns can be rename after that for more desired column names. Below shows the section of code that does this.

    def process_dataset(self):
        """ Processed the data set by converting the csv to dataframe and attached the information for various stocks.

        """

        ## Rows with additional headers are skipped
        try:
            self.target_stock_data_df =  pandas.read_csv(self.ms_stats_extract_temp_csv, header =2, index_col = 0, skiprows = [19,20,31,41,42,43,48,58,53,64,65,72,73,95,101,102])
        except:
            print 'problem downloading files. '
        self.target_stock_data_df = self.target_stock_data_df.transpose().reset_index()
        self.target_stock_data_df["SYMBOL"] = self.com_data_stock_portion_url
        #after transpose save back to same file and call again for column duplication problem
        self.target_stock_data_df.to_csv(self.ms_stats_extract_temp_csv_transpose, index =False)
        self.target_stock_data_df =  pandas.read_csv(self.ms_stats_extract_temp_csv_transpose)
        #rename columns
        self.target_stock_data_df.rename(columns={'Year over Year':'Revenue yoy','3-Year Average':'Revenue 3yr avg',
                                                '5-Year Average':'Revenue 5yr avg','10-Year Average':'Revenue 10yr avg',

                                                'Year over Year.1':'Operating income yoy','3-Year Average.1':'Operating income 3yr avg',
                                                '5-Year Average.1':'Operating income 5yr avg','10-Year Average.1':'Operating income 10yr avg',

                                                'Year over Year.2':'Net income yoy','3-Year Average.2':'Net income 3yr avg',
                                                '5-Year Average.2':'Net income 5yr avg','10-Year Average.2':'Net income 10yr avg',

                                                'Year over Year.3':'EPS yoy','3-Year Average.3':'EPS 3yr avg',
                                                '5-Year Average.3':'EPS 5yr avg','10-Year Average.3':'EPS 10yr avg',},
                                       inplace =True) 

        if len(self.com_data_allstock_df) == 0:
            self.com_data_allstock_df = self.target_stock_data_df
        else:
            self.com_data_allstock_df = pandas.concat([self.com_data_allstock_df,self.target_stock_data_df],ignore_index =True)
 

Once the data frame is formed, it can be used to perform various analysis such as checking if the stock have positive EPS growth over the years or the trend of P/E over the years. Below code include the get_trend function that will look at the historic EPS over time and whether it improves over time for a particular company.

import re, os, sys, math, time, datetime, shutil
import pandas
from pattern.web import URL, DOM, plaintext, extension, Element, find_urls

class MS_StatsExtract(object):
    """
        Using morning star ajax call.
        Can only get one stock at a time.
    """
    def __init__(self):
        """ List of url parameters -- for url formation """
        self.com_data_start_url = 'http://financials.morningstar.com/ajax/exportKR2CSV.html?&callback=?&t=XSES:'
        self.com_data_stock_portion_url = ''
        self.com_data_stock_portion_additional_url = ''# for adding additonal str to the stock url.
        self.com_data_end_url = '&region=sgp&culture=en-US&cur=&order=asc'
        self.com_data_full_url = ''
        self.stock_list = ''#list of stock to parse. 

        ## printing options
        self.__print_url = 0

        ## temp csv storage path
        self.ms_stats_extract_temp_csv = r'c:\data\temp\ms_stats.csv'
        self.ms_stats_extract_temp_csv_transpose = r'c:\data\temp\ms_stats_t.csv'

        ## Temp Results storage
        self.target_stock_data_df = object() 

        ## full result storage
        self.com_data_allstock_df = pandas.DataFrame()
        self.hist_company_data_trends_df = pandas.DataFrame()

    def set_stock_sym_append_str(self, append_str):
        """ Set additional append str to stock symbol when forming stock url.
            Set to sel.cur_quotes_stock_portion_additional_url.
            Mainly to set the '.SI' for singapore stocks.
            Args:
                append_str (str): additional str to append to stock symbol.
        """
        self.com_data_stock_portion_additional_url = append_str

    def set_target_stock_url(self, stock_sym):
        """ Set the target stock. Single stock again.
            Set to self.com_data_stock_portion_url
            Args:
                stock_sym (str): Stock symbol.
        """
        self.com_data_stock_portion_url = stock_sym

    def set_stocklist(self, stocklist):
        """ Set list of stocks to be retrieved.
            Args:
                stocklist (list): list of stocks to be retrieved.
        """
        self.stock_list = stocklist

    def form_url_str(self):
        """ Form the url str necessary to get the .csv file
            May need to segregate into the various types.
            Args:
                type (str): Retrieval type.
        """
        self.com_data_full_url = self.com_data_start_url + self.com_data_stock_portion_url +\
                                   self.com_data_end_url

    def get_com_data(self):
        """ Combine the cur quotes function.
            Formed the url, download the csv, put in the header. Have a dataframe object.
            Each one is one stock.
        """
        self.form_url_str()
        if self.__print_url: print self.com_data_full_url

        ## here will process the data set
        self.downloading_csv()

    def downloading_csv(self):
        """ Download the csv information for particular stock.

        """
        self.download_fault = 0

        url = URL(self.com_data_full_url)
        f = open(self.ms_stats_extract_temp_csv, 'wb') # save as test.gif
        try:
            f.write(url.download())#if have problem skip
        except:
            if self.__print_download_fault: print 'Problem with processing this data: ', self.com_data_full_url
            self.download_fault =1
        f.close()

    def process_dataset(self):
        """ Processed the data set by converting the csv to dataframe and attached the information for various stocks.

        """

        ## Rows with additional headers are skipped
        try:
            self.target_stock_data_df =  pandas.read_csv(self.ms_stats_extract_temp_csv, header =2, index_col = 0, skiprows = [19,20,31,41,42,43,48,58,53,64,65,72,73,95,101,102])
        except:
            print 'problem downloading files. '
        self.target_stock_data_df = self.target_stock_data_df.transpose().reset_index()
        self.target_stock_data_df["SYMBOL"] = self.com_data_stock_portion_url
        #after transpose save back to same file and call again for column duplication problem
        self.target_stock_data_df.to_csv(self.ms_stats_extract_temp_csv_transpose, index =False)
        self.target_stock_data_df =  pandas.read_csv(self.ms_stats_extract_temp_csv_transpose)
        #rename columns
        self.target_stock_data_df.rename(columns={'Year over Year':'Revenue yoy','3-Year Average':'Revenue 3yr avg',
                                                '5-Year Average':'Revenue 5yr avg','10-Year Average':'Revenue 10yr avg',

                                                'Year over Year.1':'Operating income yoy','3-Year Average.1':'Operating income 3yr avg',
                                                '5-Year Average.1':'Operating income 5yr avg','10-Year Average.1':'Operating income 10yr avg',

                                                'Year over Year.2':'Net income yoy','3-Year Average.2':'Net income 3yr avg',
                                                '5-Year Average.2':'Net income 5yr avg','10-Year Average.2':'Net income 10yr avg',

                                                'Year over Year.3':'EPS yoy','3-Year Average.3':'EPS 3yr avg',
                                                '5-Year Average.3':'EPS 5yr avg','10-Year Average.3':'EPS 10yr avg',},
                                       inplace =True) 

        if len(self.com_data_allstock_df) == 0:
            self.com_data_allstock_df = self.target_stock_data_df
        else:
            self.com_data_allstock_df = pandas.concat([self.com_data_allstock_df,self.target_stock_data_df],ignore_index =True) 

    def get_com_data_fr_all_stocks(self):
        """ Cater for all stocks. Each stock is parse one at a time.
        """
        self.com_data_allstock_df = pandas.DataFrame()

        for stock in self.stock_list:
            print 'Processing stock:', stock
            self.set_target_stock_url(stock)
            self.get_com_data()
            self.downloading_csv()
            self.process_dataset()

    ## process the data, group by each symbol and take the last 3-5 years EPS year on year??
    def get_trend_data(self):
        """ Use for getting trends data of the dataset.
            Separate to two separate type. One is looking at gain in yoy gain, which means the gain of EPS eg is higher this year over the last as
            compared to the EPS gain of last year over the previous one.
            The other is positive gain which look for gain of company over year.
            may have accel growth if starting is negative

        """
        grouped_symbol = self.com_data_allstock_df.groupby("SYMBOL")

        self.hist_company_data_trends_df = pandas.DataFrame()
        for label in ['EPS yoy','Revenue yoy','Net income yoy']:
            for n in range(9,5,-1):
                if n == 9:
                    prev_data = grouped_symbol.nth(n)[label]
                    accel_growth_check = (prev_data == prev_data) #for EPS growht increase every eyar
                    normal_growth_check =  (prev_data >0) #for normal increase
                    continue
                current_data = grouped_symbol.nth(n)[label]
                accel_growth_check = accel_growth_check & (current_data <= prev_data)
                normal_growth_check = normal_growth_check & (current_data >0)
                prev_data = current_data

            accel_growth_check = accel_growth_check.to_frame().rename(columns = {label: label + ' 4yr_accel'}).reset_index()
            normal_growth_check = normal_growth_check.to_frame().rename(columns = {label: label + ' 4yr_grow'}).reset_index()

            both_check_df =  pandas.merge(accel_growth_check, normal_growth_check, on = 'SYMBOL' )

            if len(self.hist_company_data_trends_df) ==0:
                self.hist_company_data_trends_df = both_check_df
            else:
                self.hist_company_data_trends_df = pandas.merge(self.hist_company_data_trends_df, both_check_df, on = 'SYMBOL' )

    def modify_stock_sym_in_df(self):
        """ Modify the stock sym in df especially for the Singapore stock where it require .SI to join in some cases.

        """
        self.hist_company_data_trends_df['SYMBOL']= self.hist_company_data_trends_df['SYMBOL'].astype(str) +'.SI'

    def strip_additional_parm_fr_stocklist(self, stocklist, add_parm = '.SI'):
        """ Strip the addtional paramters from the stock list. True in case where the input is XXX.SI and morning star do not required the additioanl SI.
            Args:
                stocklist (list): list of stock sym.
            Kwargs:
                add_parm (str): string to omit (.SI)

        """
        return [re.search('(.*)%s'%add_parm, n).group(1) for n in stocklist]

if __name__ == '__main__':

    choice  = 4

    if choice ==2:

        pp = MS_StatsExtract()
        pp.set_stocklist(['BN4','BS6','N4E','U96'])
        pp.get_com_data_fr_all_stocks()
        pp.get_trend_data()
        pp.modify_stock_sym_in_df()
        print pp.hist_company_data_trends_df

RSS feeds Reader GUI

The last post mentions about retrieving RSS feeds. To allow easy viewing, a GUI is constructed. The GUI is built using wxpython and consists of few adjustable pane with scrolling enabled. The user can choose to display the different group (eg: “World” and “SG” news) in separate panels.

For live updates, a wx.timer function is added to the GUI so the data can update every x time specified by the users. This post highlights the use of wx MultiSplitterWindow, scrollable panels and wx.timer for feeds live updates.

feeds_watcher

import os, sys, re, time
import wx
from wx.lib.splitter import MultiSplitterWindow
from General_feed_extract import FeedsReader
import  wx.lib.scrolledpanel as scrolled

class SamplePane(scrolled.ScrolledPanel):
    """
    Just a simple test window to put into the splitter.
    Set to scrollable, set to word wrap
    """
    def __init__(self, parent, label):
        scrolled.ScrolledPanel.__init__(self, parent,style = wx.BORDER_SUNKEN)
        #self.SetBackgroundColour(colour)
        self.textbox = wx.TextCtrl(self, -1, label,style=wx.TE_MULTILINE )
        vbox = wx.BoxSizer(wx.VERTICAL)
        vbox.Add(self.textbox, 1, wx.ALIGN_LEFT | wx.ALL|wx.EXPAND, 5)
        self.SetSizer(vbox)
        self.SetAutoLayout(1)
        self.SetupScrolling()

        self.SetupScrolling()
    def SetOtherLabel(self, label):
        self.textbox.SetValue(label)
        self.SetupScrolling()

class MyPanel(wx.Panel):
    def __init__(self, parent):
        wx.Panel.__init__(self, parent, -1)
        self.parent = parent

        ## Add in the feeds parameters
        self.reader = FeedsReader()

        ## Add in timer
        self.timer = wx.Timer(self)
        self.Bind(wx.EVT_TIMER, self.on_timer_update_feeds, self.timer)
        self.timer.Start(30000) # start timer after a delay, time in milli sec

        splitter = MultiSplitterWindow(self, style=wx.SP_LIVE_UPDATE)
        self.splitter = splitter
        sizer = wx.BoxSizer(wx.HORIZONTAL)
        sizer.Add(splitter, 1, wx.EXPAND)
        self.SetSizer(sizer)

        self.world_news_panel = SamplePane(splitter, "Panel One")
        splitter.AppendWindow(self.world_news_panel, 140)

        self.SG_panel = SamplePane(splitter, "Panel Two")
        #self.SG_panel.SetMinSize(self.SG_panel.GetBestSize())
        splitter.AppendWindow(self.SG_panel, 180)

        self.others_panel = SamplePane(splitter,  "Panel Three")
        splitter.AppendWindow(self.others_panel, 105)

        ## Set the orientation
        self.splitter.SetOrientation(wx.VERTICAL)

        ## Updates the panel
        self.update_panels()

    def get_feeds(self):
        """ Run the get feeds class. Use for getting updates of the feeds.

        """
        self.reader.parse_rss_sites_by_cat()

    def update_panels(self):
        """ Update all the panels with the updated feeds.
            Can use the set other label method

        """
        self.get_feeds()
        self.update_SG_panel()
        self.update_world_panel()

    def update_world_panel(self):
        """ Update World_panel on the World news.

        """
        date_key = self.reader.set_last_desired_date(0)
        if self.reader.rss_results_dict_by_cat['World'].has_key(date_key):
            World_news_list = self.reader.rss_results_dict_by_cat['World'][date_key]
            World_news_str = '\n********************\n'.join(['\n'.join(n) for n in World_news_list])
            self.world_news_panel.SetOtherLabel(World_news_str)

    def update_SG_panel(self):
        """ Update SG_panel on the Singapore stock news.

        """
        date_key = self.reader.set_last_desired_date(0)
        if self.reader.rss_results_dict_by_cat['SG'].has_key(date_key):
            SG_news_list = self.reader.rss_results_dict_by_cat['SG'][date_key]
            SG_news_str = '\n********************\n'.join(['\n'.join(n) for n in SG_news_list])
            self.SG_panel.SetOtherLabel(SG_news_str)

    def on_timer_update_feeds(self,evt):
        """ Update feeds once timer reach.
        """
        print 'Updating....'
        self.update_panels()

    def SetLiveUpdate(self, enable):
        if enable:
            self.splitter.SetWindowStyle(wx.SP_LIVE_UPDATE)
        else:
            self.splitter.SetWindowStyle(0)

class MyFrame(wx.Frame):
    def __init__(self, parent, ID, title):      

        wx.Frame.__init__(self, parent, ID, title,pos=(150, 20), size=(850, 720))#size and position

        self.top_panel = MyPanel(self)

class MyApp(wx.App):
    def __init__(self):
        wx.App.__init__(self,redirect =False)
        self.frame= MyFrame(None,wx.ID_ANY, "Feeds Watcher")
        self.SetTopWindow(self.frame)

        self.frame.Show()

def run():
    try:
        app = MyApp()
        app.MainLoop()
    except Exception,e:
        print e
        del app

if __name__== "__main__":
    run()

The following links contains information on setting up scroll bars in wx and also working with wx.timers.

  1. wx scroll bar help
  2. wx timers

Get RSS feeds using python pattern

Python Pattern allows easy way to retrieve RSS feeds. The following script will act as a feeds reader and retrieve feeds from various sites, focusing on world news and related Singapore stock market in this example.

The pattern module has the NewsFeed() function that can take in RSS url and output the corresponding results.  The following is the description of the Newsfeed object from the pattern website “The Newsfeed object is a wrapper for Mark Pilgrim’s Universal Feed Parser. Newsfeed.search() takes the URL of an RSS or Atom news feed and returns a list of Result objects.”

This will return object that has the following attributes title, link and desc. The script below takes in a dict with the different categories as key. The value are the list of RSS url belonging to that category. The script will output results in the form of dict of categories and results of each category are segregated by date key. This script allows consolidation of different feeds from various RSS sources enabling the user to further process the feeds. The printing of the feeds can be limited by the set_last_desired_date() which display only results from a certain date.

import os, re, sys, time, datetime, copy, calendar
from pattern.web import URL, extension, cache, plaintext, Newsfeed

class FeedsReader(object):
    def __init__(self):

        #For grouping to various category
        self.rss_sites_by_category_dict = {
                                            'SG':   [
                                                        'http://feeds.theedgemarkets.com/theedgemarkets/sgtopstories.rss',
                                                        'http://feeds.theedgemarkets.com/theedgemarkets/sgmarkets.rss',
                                                        'http://feeds.theedgemarkets.com/theedgemarkets/sgproperty.rss',
                                                      ],
                                            'World':[
                                                        'http://www.ft.com/rss/home/asia',
                                                        'http://rss.cnn.com/rss/money_news_economy.rss',
                                                        'http://feeds.reuters.com/reuters/businessNews',
                                                      ],
                                            }
        self.rss_sites = []

        ## num of feeds to parse_per_site
        self.num_feeds_parse_per_site = 100

        ## individual group storage of feeds.
        self.rss_results_dict = {} # dict with date as key
        self.rss_title_list = []

        ## full results set consist of category
        self.rss_results_dict_by_cat ={} # dict of dict
        self.rss_title_list_by_cat = {}  # dict of list

    def set_rss_sites(self, rss_site_urls):
        """ Set to self.rss_sites.
            Args:
                rss_site_urls (list): list of rss site url for getting feeds.
        """
        self.rss_sites = rss_site_urls

    def convert_date_str_to_date_key(self, date_str):
        """ Convert the date str given by twiiter [created_at] to date key in format YYYY-MM-DD.
            Args:
                date_str (str): date str in format given by twitter. 'Mon Sep 29 07:00:10 +0000 2014'
            Returns:
                (int): date key in format YYYYMMDD
        """
        date_list = date_str.split()

        month_dict = {v: '0'+str(k) for k,v in enumerate(calendar.month_abbr) if k <10}
        month_dict.update({v:str(k) for k,v in enumerate(calendar.month_abbr) if k >=10})

        return int(date_list[3] + month_dict[date_list[2]] + date_list[1])

    def parse_rss_sites(self):
        """ Function to parse the RSS sites.
            Results are stored in self.rss_results_dict with date as key.
        """
        self.rss_results_dict = {}
        self.rss_title_list = []

        cache.clear()

        for rss_site_url in self.rss_sites:
            print "processing: ", rss_site_url
            for result in Newsfeed().search(rss_site_url)[:self.num_feeds_parse_per_site]:
                date_key = self.convert_date_str_to_date_key(result.date)
                self.rss_title_list.append(result.title)
                if self.rss_results_dict.has_key(date_key):
                    self.rss_results_dict[date_key].append([result.title,  plaintext(result.text)])
                else:
                    self.rss_results_dict[date_key] = [[result.title,  plaintext(result.text)]]
        print 'done'

    def parse_rss_sites_by_cat(self):
        """ Iterate over the list of categories and parse the list of rss sites.
        """
        self.rss_results_dict_by_cat ={} # dict of dict
        self.rss_title_list_by_cat = {}  # dict of list

        for cat in self.rss_sites_by_category_dict:
            print 'Processing Category: ', cat
            self.set_rss_sites(self.rss_sites_by_category_dict[cat])
            self.parse_rss_sites()
            self.rss_results_dict_by_cat[cat] = self.rss_results_dict
            self.rss_title_list_by_cat[cat] = self.rss_title_list

    def set_last_desired_date(self, num_days = 0):
        """ Return the last date in which the results will be displayed.
            It is set to be the current date - num of days as set by users.
            Affect only self.print_feeds function.
            Kwargs:
                num_days (int): num of days prior to the current date.
                Setting to 0 will only retrieve the current date
            Returns:
                (int): datekey as yyyyymmdd.
        """
        last_eff_date_list = list((datetime.date.today() - datetime.timedelta(num_days)).timetuple()[0:3])

        if len(str(last_eff_date_list[1])) == 1:
            last_eff_date_list[1] = '0' + str(last_eff_date_list[1])

        return int(str(last_eff_date_list[0]) + last_eff_date_list[1] + str(last_eff_date_list[2]))

    def print_feeds(self, rss_results_dict):
        """ Print the RSS data results. Required the self.rss_results_dict.
            Args:
                rss_results_dict (dict): dict containing date as key and title, desc as value.
        """
        for n in rss_results_dict.keys():
            print 'Results of date: ', n
            dataset = rss_results_dict[n]
            if int(n) >= self.set_last_desired_date():
                print '===='*10
                for title,desc in dataset:
                    print title
                    print desc
                    print '--'*5
                    print

    def print_feeds_for_all_cat(self):
        """ Print feeds for all the category specified by the self.rss_results_dict_by_cat

        """
        for cat in self.rss_results_dict_by_cat:
            print 'Printing Category: ', cat
            self.print_feeds(self.rss_results_dict_by_cat[cat])
            print
            print "####"*18

if __name__ == '__main__':
        f = FeedsReader()
        f.parse_rss_sites_by_cat()
        print '=='*19
        f.print_feeds_for_all_cat()

The results are as followed:

Processing Category: World
processing: http://www.ft.com/rss/home/asia
processing: http://rss.cnn.com/rss/money_news_economy.rss
processing: http://feeds.reuters.com/reuters/businessNews
done
Processing Category: SG
processing: http://feeds.theedgemarkets.com/theedgemarkets/sgtopstories.rss
processing: http://feeds.theedgemarkets.com/theedgemarkets/sgmarkets.rss
processing: http://feeds.theedgemarkets.com/theedgemarkets/sgproperty.rss
done
======================================

Printing Category: World
Results of date: 20150126
Results of date: 20150127
========================================
China seeks end to gold medal fixation
‘Blind pursuit’ of success condemned as sports administrator scraps rewards for victory
———-

Tsipras poised to unveil new Greek cabinet
Athens and international creditors dig in on Greek debt
———-

EU threatens Russia with more sanctions
Call comes as violence in eastern Ukraine escalates
———-

……..

Printing Category: SG
Results of date: 20150127
========================================
Singapore shares higher; ComfortDelGro shines on broker upgrade
SINGAPORE (Jan 27): Gains in most Asian markets helped lift Singapore shares, with much of the buying centred on penny stocks.

Gainers outnumbered decliners 267 to 187, with some 1.84 billion shares worth $1.49 billion shares changin…
———-

Job vacancies in Singapore up 8.9%
SINGAPORE (Jan 27): The number of job vacancies in Singapore swelled to 67,400 in the year to September 2014, from 61,900 the previous year, with the services industry in greatest need of workers.

The bulk of the vacancies was from c…

Rapid input data from list of files to SQLite DB

Suppose you wish to input all the data from a series of CSV files residing in a particular folder to a SQLite database, the following tools and and commands will make it a relatively fast and painless.

Each of the CSV file are assumed to be in the format where the first line is the headers and the subsequent lines are series of data. The headers need not be the same for each CSV file.

The following python modules are required.

  1. CSV module
  2. Pandas (0.15)
  3. SQLite3

The following lines of commands will input execute the following actions.

  1. Use list comprehension to get the list of file path from a particular folder.
  2. Convert the data from each CSV file into dict format using CSV DictReader and iterate over all the files, joining them to a list.
  3. Convert the list of dicts to a single Pandas Dataframe.
  4. Create a connection to a particular SQLite Database.
  5. Use Pandas to_sql() function to pass all the data to SQLite database.
  6. The code is displayed below.
<pre>import os
import csv
import pandas
import sqlite3 as lite

path = r'C:\folderpath\to\list\of\files'
## Get the full path of all the csv files.
full_path_list = [os.path.join(path,f) for\
				 f in os.listdir(path) if os.path.isfile(os.path.join(path,f)) ]

## Convert all data to list of dicts.
full_data_list =  [n for f in full_path_list for n in csv.DictReader(open(f,'r'))]

## SQL database name and initialize the sql connection.
db_filename = r'c:\data\sbrtemp3.db'
con = lite.connect(db_filename)

## Convert to dataframe and write to sql database.
pandas.DataFrame(full_data_list).to_sql('test', con, flavor='sqlite',
				schema=None, if_exists='replace', index=True,
				index_label=None, chunksize=None, dtype=None)

## Close the SQL connection
con.close()

The Pandas to_sql() function is able to handle issues of duplicates and can be called multiple times if users required to add additional data. In addition, converting to a dataframe from a list of dicts also allows the headers to be different for different CSV files. Besides saving to database, user can also choose to consolidate to a single csv file by using Pandas to_csv() function.

Scraping Company info using Yahoo Query Language (YQL) and Python

Additional stock data such as company balance sheets and financial records can be scraped from yahoo finance website as described in the previous post. An alternative way which is much faster can be done using the Yahoo Query Language (YQL) . It provides collections of data  from various sources including Yahoo finance data and enable easy query of specific data sets. The results is generated in the form of json format which itself can be easily retrieved from the url link generated from the YQL query.

The YQL provides a YQL console which provides easy way for users to key in the SQL syntax to query for particular information. For example, to obtain key company statistics such as P/E ratio, cash flow etc. The following SQL can be inputted into the console.

SELECT * FROM yahoo.finance.keystats WHERE symbol in ("N4E.SI","BS6.SI")

Pressing the “Test” button will generate a url that will link to the json file containing all the information. Example of the url string is as below.

https://query.yahooapis.com/v1/public/yql?q=SELECT%20*%20FROM%20yahoo.finance.keystats%20WHERE%20symbol%20in%20(%22N4E.SI%22%2C%22BS6.SI%22)&format=json&diagnostics=true&env=store%3A%2F%2Fdatatables.org%2Falltableswithkeys&callback=

The url can now be used with the PATTERN module to download and processed the json information. For reading json file, simplejson module can be used. The url can be modified easily to include more stock symbols (the text highlighted in blue). For each url, I have included about 45 stocks symbols and loop it for all the stock symbols required. Users can also customize and filter the data using standard SQL syntax.

This method is much faster compared to the direct scraping method described previously as multiple stock symbols can be processed at one go and the json data can be easily retrieved. In contrast, direct scraping can only processed single web page (or stock) at one go and require handling of XPATH to get the data correctly.

The YQL contains 1000 of tables from different websites such as Flickr, wordpress, twitter etc and the data are easily organized in table form for easy retrieval. The url string also provides additional flexibility to query more data set.

The script for this can be easily done using standard url string formation, downloading of raw data using the Pattern module, reading the data using simplejson and converting the data to dataframe using Python Pandas.

One advantage of json file is that it is basically a dict file (of eg 45 stocks symbols) and a list of dict files can be easily transformed to a pandas Data frame for further processing. Below code abstract shows the portion in which the json file is being loaded and converted to a dict to append to a list. This list is in turn convert to Dataframe object by passing the list of dicts to the Dataframe object.

    def get_datalist_fr_json(self):
        """
            Set to self.com_data_allstock_list.
            Will keep appending without any reset.
        """
        raw_data  = json.load(open(self.saved_json_file, 'r'))
        for indivdual_set in  raw_data['query']['results']['stats']:
            temp_dict_data = {}
            if type(indivdual_set) == str:
                #for single data
                continue # temp do not use
            for parameters in indivdual_set.keys():
                if type(indivdual_set[parameters]) == str:
                    temp_dict_data[parameters] = indivdual_set[parameters]#for symbol
                elif type(indivdual_set[parameters]) == dict:
                    if indivdual_set[parameters].has_key('content'):
                        temp_dict_data[parameters] = indivdual_set[parameters]['content']

            ## append to list
            self.com_data_allstock_list.append(temp_dict_data)

    def get_com_data_fr_all_stocks(self):
        """ Cater for situation where there is large list.
            For safeguard, clip limit to 49.
        """
        full_list = self.replace_special_characters_in_list(self.full_stocklist_to_retrieve)
        chunk_of_list = self.break_list_to_sub_list(self.full_stocklist_to_retrieve)

        self.temp_full_data_df = None
        for n in chunk_of_list:
            # print the progress
            sys.stdout.write('.')

            # set the small chunk of list
            self.set_target_stocks_list(n)
            self.get_com_data()

        # convert to dataframe
        self.com_data_allstock_df = pandas.DataFrame(self.com_data_allstock_list)
        self.com_data_allstock_df.rename(columns ={'symbol':'SYMBOL'}, inplace=True)


Basic Stock Technical Analysis with python

Simple technical analysis for stocks can be performed using the python pandas module with graphical display. Example of  basic analysis including simple moving averages, Moving Average Convergence Divergence (MACD) and Bollinger bands and width.

For the tech analysis to be performed, daily prices need to be collected for each stock. The Yahoo Finance API can retrieve the required data. The previous post described the method to link the YF API to python. After the historical prices are retrieved, the method for getting the various technical analysis can be easily done using the Pandas rolling mean method and plots can be done using Pandas plot function and additional help from Matplotlib.

Below is snippet of the script that initialize the hist data pulling and display the Bollinger Bands and Bollinger Width for a particular stock (Keppel Corp: BN4.SI).

import os, re, sys, time, datetime, copy, shutil
import pandas
from yahoo_finance_historical_data_extract import YFHistDataExtr
import matplotlib.pyplot as plt

if __name__ == '__main__':
        data_ext = YFHistDataExtr()
        data_ext.set_interval_to_retrieve(200)#in days
        data_ext.set_multiple_stock_list(['BN4.SI'])
        data_ext.get_hist_data_of_all_target_stocks()
        # convert the date column to date object
        data_ext.all_stock_df['Date'] =  pandas.to_datetime( data_ext.all_stock_df['Date'])
        temp_data_set = data_ext.all_stock_df.sort('Date',ascending = True ) #sort to calculate the rolling mean
       
        temp_data_set['20d_ma'] = pandas.rolling_mean(temp_data_set['Adj Close'], window=20)
        temp_data_set['50d_ma'] = pandas.rolling_mean(temp_data_set['Adj Close'], window=50)
        temp_data_set['Bol_upper'] = pandas.rolling_mean(temp_data_set['Adj Close'], window=20) + 2* pandas.rolling_std(temp_data_set['Adj Close'], 20, min_periods=20)
        temp_data_set['Bol_lower'] = pandas.rolling_mean(temp_data_set['Adj Close'], window=20) - 2* pandas.rolling_std(temp_data_set['Adj Close'], 20, min_periods=20)
        temp_data_set['Bol_BW'] = ((temp_data_set['Bol_upper'] - temp_data_set['Bol_lower'])/temp_data_set['20d_ma'])*100
        temp_data_set['Bol_BW_200MA'] = pandas.rolling_mean(temp_data_set['Bol_BW'], window=50)#cant get the 200 daa
        temp_data_set['Bol_BW_200MA'] = temp_data_set['Bol_BW_200MA'].fillna(method='backfill')##?? ,may not be good
        temp_data_set['20d_exma'] = pandas.ewma(temp_data_set['Adj Close'], span=20)
        temp_data_set['50d_exma'] = pandas.ewma(temp_data_set['Adj Close'], span=50)
        data_ext.all_stock_df = temp_data_set.sort('Date',ascending = False ) #revese back to original
        
        data_ext.all_stock_df.plot(x='Date', y=['Adj Close','20d_ma','50d_ma','Bol_upper','Bol_lower' ])
        data_ext.all_stock_df.plot(x='Date', y=['Bol_BW','Bol_BW_200MA' ])
        plt.show()

Bollinger Band of BN4

Generate NLP training sets using Google search module

In sentiment analysis or natural language processing, training sets are required to create the different classifiers in order to interpret phrases of words or assign appropriate sentiment features to particular phrases or texts . In general, the larger the training sets the higher the accuracy of the interpreted sentiment or results.

To produce a large training set, it is required to source manually large number of raw data and classifier them manually, which in turn, a tedious process. Google search results might be one alternative to collect the training sets which are already classified due to the defining boundaries set by the Google search keywords.

Hence, one of the way to create a large training set is to utilize the Google search module described in the previous post. We can input the description of the end target result (and hence, the classifier)  and the google search will return the brief description. The brief description will usually contain snippets of news/event relate up to the events or end results. These provide the basis for the classifier.

An example of such use will be to classify stocks news into positive news (that make stocks prices rise) or negative news (that cause stock prices to fall). For positive stock outlook we can use the following keywords”Shares rise by xxx” or “Price jump”, the Google search results will return all the contents or news that have the keywords. This will eventually provide all the positive sentiment phrases or news that will predict whether prices increase or fall. The following diagram simplify the procedure.

Creating Classifiers from Google Search

To make it easier for user to generate the classifier, a GUI function is created. Below GUI is generated using the wx,itempicker module. Users can input the google search texts (can have multiple entries separated by “;”) that will hint the classifiers and run the Google search and all the links results will be displayed on the left text box. The user can then proceed to select the items, After which all the items are selected, the user can proceed to save all the data in a file or copy to clipboard for further processing. While copying, it can append the classifier label to the sentences.

Classifer GUI

The final output are copied to clipboard. Below is the output. Note that commas except the classifier label parts are removed from the sentences.

Japan, China Stocks Lead Asia Gains on Yen Data – ABC News,pos
Shares Extend Gains on Overseas Economic News – NYTimes.com,pos
Rising Share Prices on London South East. Share Prices on all …,pos
Stock market logs 5th straight week of gains as Dow hits record high …,pos
Stock market rise sharply after nightmarish week for Dow Jones …,pos
Stock market wants to rise despite global fears – CNBC.com,pos
Stock markets could gain despite Big Oil’s pain | Reuters,pos
Stocks end mostly up as gains extend into 4th week | Stock market …,pos

Sample of the codes below. The code mainly used to define the various wx widgets. It requires the wx module and for the clipboard, it requires another script for the clipboard function. Alternatively, the copy function can be easily replaced by saving to target file or other storage.

import os, sys, time, datetime

## wx imports
import wx
from wx.lib.itemspicker import ItemsPicker,EVT_IP_SELECTION_CHANGED, IP_SORT_CHOICES
from wx.lib.itemspicker import IP_SORT_SELECTED,IP_REMOVE_FROM_CHOICES

## Google search module using python pattern
from Python_Google_Search_Retrieve import gsearch_url_form_class

## pyET_tools import, clipboard, for storing data to clipboard,
## can be substitued with alternative such as storing to file.
import pyET_tools.Clipboard_handler as Clip

class MyPanel(wx.Panel):
    def __init__(self,parent):
        wx.Panel.__init__(self,parent)
        self.parent = parent

        ## list of parameters
        self.google_results= []
        self.add_classifier_str = 'pos' # add either classifer pos or neg to the str\
        self.search_word_list = [] #
        self.picked_item_list = []

        ## wx widgets
        ## Top panel display sizer for google search keywords input
        ## Hold the search Enter box and button to execute the search
        ## keywords are entered in single box but separate by ;
        top_display_sizer = wx.BoxSizer(wx.HORIZONTAL)
        search_label = wx.StaticText(self, -1, "Google Search keywords")
        self.search_textbox = wx.TextCtrl(self, -1, size=(400, -1))
        search_btn = wx.Button(self, -1, "Search")
        search_btn.Bind(wx.EVT_BUTTON, self.OnSearch)
        top_display_sizer.Add(search_label, 0, wx.ALL, 5)
        top_display_sizer.Add(self.search_textbox, 0, wx.ALL, 5)
        top_display_sizer.Add(search_btn, 0, wx.ALL, 5)

        ## Mid panel sizer
        ## Hold the classifier label Enter box and also the button for copy data to clipboard
        ## The button can be modified to save the picked items.
        mid_display_sizer = wx.BoxSizer(wx.HORIZONTAL)
        classifier_label = wx.StaticText(self, -1, "Classifier label")
        copy_output_btn = wx.Button(self, -1, "Copy")
        copy_output_btn.Bind(wx.EVT_BUTTON, self.CopyPickedItems)
        self.classifier_textbox = wx.TextCtrl(self, -1, self.add_classifier_str, size=(125, -1))
        mid_display_sizer.Add(classifier_label,0, wx.ALL, 5)
        mid_display_sizer.Add(self.classifier_textbox, 0, wx.ALL, 5)
        mid_display_sizer.Add(copy_output_btn, 0, wx.ALL, 5)

        ## Main sizer
        ## Item picker widgets.
        main_sizer =wx.BoxSizer(wx.VERTICAL)
        main_sizer.Add(top_display_sizer, 0, wx.TOP|wx.LEFT, 3)
        main_sizer.Add(mid_display_sizer, 0, wx.TOP|wx.LEFT, 3)
        self.ip = ItemsPicker(self,-1, [], 'All items', 'Selected items:',ipStyle = IP_SORT_CHOICES)
        self.ip.Bind(EVT_IP_SELECTION_CHANGED, self.OnSelectionChange)
        self.ip._source.SetMinSize((-1,150))
        main_sizer.Add(self.ip, 1, wx.ALL|wx.EXPAND, 10)
        self.SetSizer(main_sizer)
        self.Fit()

    def OnSearch(self,e):
        """ Generate the list of google search results.
            Set the items on the left textctrl box.
        """
        gs_keywords_list = self.split_google_keywords()
        self.OnGoogleRun(gs_keywords_list)
        self.ip.SetItems(self.google_results)

    def split_google_keywords(self):
        """ Split the google keywords  based on ";" for multiple keywords entry.
            Returns:
                (list): list of keywords to be used.
                        Remove any empty words accidentially bound by ;
        """
        search_items =  self.search_textbox.GetValue()
        search_items_list = search_items.split(';')
        return [n for n in search_items_list if n!='']

    def append_classifier_to_text(self, selected_txt_list):
        """ Add the classifier to the selected text.
            Args:
                selected_txt_list (list): list of str that contains the selected text.
            Returns:
                (list): list with classifer text added. eg. ",pos"
        """
        return [n + ',' + self.add_classifier_str for n in selected_txt_list]

    def get_classifier_txt(self):
        """ Query and Set the classifier txt to self.add_classifier_str
            Query from the self.classifier_textbox.
        """
        self.add_classifier_str = self.classifier_textbox.GetValue()

    def CopyPickedItems(self,e):
        """ Copy the selected item to clipboard.
            Get all the items on the selected list, append the pos str and save to clipboard
        """
        ## get classifier text
        self.get_classifier_txt()

        ## get the picked items
        selected_txt_list = self.picked_item_list

        ## append classifier text to picked items
        selected_txt_list = self.append_classifier_to_text(selected_txt_list)

        ## copy the items to clipboard
        Clip.copy_list_to_clipbrd(selected_txt_list)

    def OnSelectionChange(self, e):
        """ Trigger for the item picker when items are being selected or picked.
            Set to self.picked_item_list.
        """
        self.picked_item_list =  e.GetItems()

    def OnGoogleRun(self, search_words):
        """ Run the google search results to get all the link

        """
        ## User options
        NUM_SEARCH_RESULTS = 50                # number of search results returned

        ## Create the google search class
        hh = gsearch_url_form_class(search_words)
        hh.print_parse_results = 0

        ## Set the results
        hh.set_num_of_search_results(NUM_SEARCH_RESULTS)
        hh.enable_sort_date_descending()# enable sorting of date by descending. --> not enabled

        ## Generate the Url list based on the search item
        url_list =  hh.formed_search_url()

        ## Parse the google page based on the url
        hh.parse_all_search_url()
        hh.consolidated_results()

        self.google_results = hh.merged_result_desc_list
        print 'End Search'

class MyFrame(wx.Frame):
    def __init__(self, parent, ID, title):
        wx.Frame.__init__(self, parent, ID, title,pos=(50, 150), size=(950, 520))#size and position
        self.top_panel = MyPanel(self)

class MyApp(wx.App):
    def __init__(self):
        wx.App.__init__(self,redirect =False)
        self.frame= MyFrame(None,wx.ID_ANY, "item picker")
        self.frame.Show()

def run():
    try:
        app = MyApp()
        app.MainLoop()
    except Exception,e:
        print e
        del app

if __name__== "__main__":
    run()

(more…)

Google Image Search with Python (part 1)

Google has a image  search feature that allows users to input a image and search for related web pages that embed the image (reverse image search). Google also shows related images that are similar to the targeted image.

There are multiple ways to input the image into Google search such as drag-and-drop to the search input box, upload the file or provide an url link of the image. Note that Google will store all the images that have been uploaded for its own internal use.

The project here will try to make use of the image url link to pull the Google results automatically. The overall flow is as below:

  1. Upload image to a fixed location that can provide a public link of the image url.
  2. Combined the image url to the Google image search url
  3. Google image search url is of the following format
  4. Scrape the Google Result page returned from the combined url for the results.

Item 1 is difficult as it would required a place to upload and store the new image and at the same time return the correct url. The concept is to use cloud storage such as Dropbox or BOX which allow public to view the file if provide the url link and at the same time acts as regular folder on the local computer.

This project will use BOX to perform item 1. It requires an BOX account and installation of BOX to local computer. After which, the following steps are required.

  1. Create a temp folder and a dummy image (.jpg)
  2. Note the image file name. This should not be changed as it will affect the final url.
  3. Copy the public link and paste to browser. The public link will be used in script for subsequent pulling.
  4. The browser will re-direct to the BOX image viewer. The manual way to retrieve the image url can be by right clicking on the image and select image url.
  5. The image will be of the following format.
  6. If the image is subsequently be overwritten, the filename should not change BUT the file_version  will be updated hence the url will change with the new file version (highlighted in blue)

The script for this part will be to automatically get the url from the BOX page given the public link. Note that inputting the url and direct scraping of the webpage will not get the image url as it need to wait for the javascript execution.

One way to overcome this is to use Selenium (Web browser Automation). This will automatically execute any Javascript and retrieved the final html of the page. With the final html, we can use the Python pattern DOM object to parse the image url.

Below is the class for the getting the image url to be inputted to Google search. For this post, only this portion is displayed.

import re, os, sys, math, time, datetime, shutil
from pattern.web import URL, DOM, plaintext, extension, Element, find_urls
from contextlib import closing
from selenium.webdriver import Firefox
from selenium.webdriver.support.ui import WebDriverWait

class BoxImageUrl(object):
    """ Fetch the url of a public share link pic.
        Can write a image to that particular file and get the latest url of that file
        Need to wait for sometime for the image to load --> can use before and after to see any chnage in the words
        Need to wait for the box image to load up.

        Note:
        self.share_folder_url  --> public folder link of BOX. Set by user.
        self.local_image_store_path --> placeholder for all new image. All new image is to overwrite this file.
                                        Set by user.

    """
    def __init__(self):
        ## url parametesr
        self.share_folder_url = 'https://app.box.com/s/jlwchpjfcpueq1gshij7' #use to go to box to get the image url
        self.box_image_full_url = ''
        self.box_image_start_url = 'https://app.box.com/representation/file_version_'
        self.box_image_end_url =''

        ## local placeholder location.
        self.local_image_store_path = r'C:\Users\Tan Kok Hua\Box Sync\temp\stock2.jpg'
        self.image_version = '0' #current version that exists
        self.image_version_history = '0' # Use to check version or whether file has already uploaded.

        ## general use
        self.dom_object = object()

        ## Error/ debug / monitor
        self.url_query_timeout = 0
        self.new_image_upload_check_cntdn = 10 # number of times before the while loop break for checking.

    def set_box_public_link_of_image(self, image_public_link):
        """ Set the public link of image based on BOX.
            To get the public link. Go to Box Sync folder, navigate to image, right click and select Share Box link.
            Args:
                image_public_link (str): http string of the image public link.
       """
        self.share_folder_url = image_public_link

    def fetch_image_url_fr_box(self):
        """ Fetch Image url for Box.com.
            Set to self.image_url.
            Make use of selenium.

        """
        with closing(Firefox()) as browser:
             browser.get(self.share_folder_url)
             time.sleep(3)
             page_source = browser.page_source

        self.set_box_image_end_url(page_source)
        self.set_final_image_box_url()

    def set_box_image_end_url(self, box_page_source):
        """ From the box page source, get the box_image end url.
            Note the image version number will change with each upload of the same filename.
            Args:
                box_page_source (str): source in html.
            Returns:
                (str): inside file_version_x where x is the digit str required.
        """
        dom = DOM(box_page_source)

        ## pic will be in the img tag. For box only one img tag return
        img_element = dom("img")[0]
        ## text str will be inside this attribute or the img tag --> src.
        ## encode to get rid of the unicode
        txt_str = img_element.attributes['src'].encode()
        ## Get the image version --> mainly to use whether the image is already uploaded.
        self.image_version = re.search('file_version_(.*)/image', txt_str).group(1)
        ## extract the file version from the text str.
        self.box_image_end_url = re.search('file_version_(.*)', txt_str).group(1)

    def set_final_image_box_url(self):
        """ Get final image box url by joining the start and end url.

        """
        self.box_image_full_url = self.box_image_start_url + self.box_image_end_url

    def set_image_version_history(self):
        """ Set the image version history by scanning the website before uploading new image.
        """
        self.fetch_image_url_fr_box() # will also set the image version history
        self.image_version_history = self.image_version
        print 'Image version history', self.image_version_history

    def upload_new_image(self, target_image_path):
        """ Move the target image to the place holder defined by self.local_image_store_path
            Args:
                target_image_path (str): file path of image to be searched.
        """
        print 'uploading images'
        shutil.copy2(target_image_path, self.local_image_store_path)
        if self.has_img_uploaded():
            print 'Successful'
        else:
            print 'new image not found'

    def has_img_uploaded(self):
        """ Checked whether image has uploaded by repeatly calling the image url get.
            if self.image_version_history is changed.

        """
        for n in range(self.new_image_upload_check_cntdn):
            time.sleep(10)
            self.fetch_image_url_fr_box()
            if not self.image_version == self.image_version_history:
                ## means new version already uploaded
                return True
        return False

if __name__ == '__main__':
    choice  = 3

    if choice ==3:
        ## initialize the class
        hh = BoxImageUrl()

        ## Set the image public link from the BOX sync folder
        hh.set_box_public_link_of_image('https://app.box.com/s/jlwchpjfcpueq1gshij7')

        ## Go the public link and get the previous true image url.
        ## As the image file is continuously upload with new image, this is used to check for version.
        hh.set_image_version_history()

        ## Upload the new image to perform the google search.
        ## Time is allocated for the image to upload fully by monitoring the change in file version.
        hh.upload_new_image(r'C:\data\temp\person.jpg')

        ## Latest image url is obtained. This will eventually pass to google for image search.
        print hh.box_image_full_url

Getting historical stock quotes and dividend Info using python

The previous post describes getting stock information using python and Yahoo Finance API. This post continues to add more information using the YF API. The additional information focus on historical price trend and dividend information. The dividend information (payout consistency, date etc) are particular useful as they are not easily available for scraping.

The same concept applies here in getting the hist price and dividend information as in the previous post. First is the construction of the respective urls, then use python PATTERN module to download the .csv and finally use Pandas  to combine all the information.

The url for the hist price and dividend information are very similar. For the url formation of the hist price, it is as follows:

http://ichart.yahoo.com/table.csv?s=S58.SI&c=2009&a=9&b=23&f=2014&d=9&e=22&g=d&ignore=.csv

The blue part is the stock symbol (only one symbol can be run at a time), the pink and green portion represent the start and end date respectively. The brown portion is the interval in d,m, y. By changing the interval g = v, the dividend information as in the dividend payout at the particular date is given. The url str is as below.

http://ichart.yahoo.com/table.csv?s=S58.SI&c=2009&a=9&b=23&f=2014&d=9&e=22&g=v&ignore=.csv

For the script, the interval is easily set by using the following part of the code. The formation of url will straight away append the hist price url and dividend url in a single function.

    def set_interval_to_retrieve(self, days):
        """ Set the interval (num of days) to retrieve.
            Args:
                days (int): Number of days from current date to retrieve.
        """
        self.date_interval = days
    def calculate_start_and_end_date(self):
        """ Return the start and end (default today) based on the interval range in tuple.
            Returns:
                start_date_tuple : tuple in yyyy mm dd of the past date
                end_date_tuple : tupe in yyyy mm dd of current date today
        """
        ## today date or end date
        end_date_tuple = datetime.date.today().timetuple()[0:3] ## yyyy, mm, dd
        start_date_tuple = (datetime.date.today() - datetime.timedelta(self.date_interval)).timetuple()[0:3]
        return start_date_tuple, end_date_tuple

    def form_hist_quotes_date_interval_portion_url(self):
        """ Form the date interval portion of the url
            Set to self.hist_quotes_date_interval_portion_url
            Note: add the number of the month minus 1.
        """
        start_date_tuple, end_date_tuple = self.calculate_start_and_end_date()

        from_date_url_str = '&c=%s&a=%s&b=%s' %(start_date_tuple[0],start_date_tuple[1]-1, start_date_tuple[2])
        end_date_url_str = '&f=%s&d=%s&e=%s' %(end_date_tuple[0],end_date_tuple[1]-1, end_date_tuple[2])
        interval_str = '&g=d'
        dividend_str = '&g=v'

        self.hist_quotes_date_interval_portion_url = from_date_url_str + end_date_url_str + interval_str
        self.hist_quotes_date_dividend_portion_url = from_date_url_str + end_date_url_str + dividend_str

For the hist stock data part, the current script only retrieve the past 3 days behaviour of a particular stock. It will show whether a stock is continuously rising or falling  for the past 3 days. It simply compares the 3 day prices to see if the prices get lower or higher with each coming day. This script is limited in the aspect that it cater for only 3 days running. There is room to improve upon this aspect.

For the dividend part, it is more interesting. It will retrieve information on whether the stock have been continuing giving out dividends every year for the past four years. It will also display the number of times each year the dividends are given out. In addition, it also provides the quarter (calender year) in which the dividends are given out based on past year.

Below are the parts of the code that capture the dividends information. It make uses of the pandas Data frame. First, several columns are added for easy processing. The dates are split to year and month columns for easier date processing. In addition, the dividend months are identified for each payout and classified to specific quarters.

    def insert_yr_mth_col_to_div_df(self):
        """ Insert the year and month of dividend to div df.
            Based on the self.all_stock_div_hist_df["Date"] to get the year and mth str.
            Set back to self.all_stock_div_hist_df
        """
        self.all_stock_div_hist_df['Div_year'] = self.all_stock_div_hist_df['Date'].map(lambda x: int(x[:4]))
        self.all_stock_div_hist_df['Div_mth'] = self.all_stock_div_hist_df['Date'].map(lambda x: int(x[6:7]))

    def insert_dividend_quarter(self):
        """ Insert the dividend quarter. Based on Calender year.
        """

        #combined all the div mth??
        self.all_stock_div_hist_df['Div_1stQuarter'] = self.all_stock_div_hist_df['Div_mth'].isin([1,2,3,])
        self.all_stock_div_hist_df['Div_2ntQuarter'] = self.all_stock_div_hist_df['Div_mth'].isin([4,5,6])
        self.all_stock_div_hist_df['Div_3rdQuarter'] = self.all_stock_div_hist_df['Div_mth'].isin([7,8,9])
        self.all_stock_div_hist_df['Div_4thQuarter'] = self.all_stock_div_hist_df['Div_mth'].isin([10,11,12])

The next part focus on deciding whether the stock has been consistently giving out dividend for the past four years (Need to adjust the date if wish to set to longer periods.). The script will first filter the information so that the data only contain information for past 4 years. Using Pandas Groupby function, it will group the raw data by stock by year. It will count the number of year exist for the stock. If the stock has been giving out dividends yearly, it will count 4 which is one for each year. Using the aggregation “mean”, it will also calculate on average number of times the payout per year.

    def get_num_div_payout_per_year(self):
        """ Get the number of div payout per year, group by symbol and year.
            Exclude the curr year information.
        """
        curr_yr, curr_mth = self.get_cur_year_mth()

        ## exclude the current year as dividend might not have pay out yet and keep within 4 years period
        target_div_hist_df = self.all_stock_div_hist_df[~(self.all_stock_div_hist_df['Div_year']== curr_yr)]
        target_div_hist_df = target_div_hist_df[target_div_hist_df['Div_year']>= curr_yr-4]

        ## get the div payout each year in terms of count
        div_cnt_df =  target_div_hist_df.groupby(['SYMBOL', 'Div_year']).agg("count").reset_index()
        div_payout_df = div_cnt_df.groupby('SYMBOL').agg('mean').reset_index()[['SYMBOL','Dividends']].rename(columns = {'Dividends':'NumDividendperYear'})

        ## get the number of years div pay for 4 year period --4 means every year.
        div_cnt_yr_basis_df = div_cnt_df.groupby('SYMBOL').agg('count').reset_index()[['SYMBOL','Div_year']].rename(columns = {'Div_year':'NumYearPayin4Yr'})

        ## join the data frame
        self.all_stock_consolidated_div_df = pandas.merge(div_payout_df,div_cnt_yr_basis_df, on = 'SYMBOL')

The last part focus on the quarter in which dividend payout resides. It will first filter out data by last year only. Then, it will group the data by Symbol and iterate over the rows to see the four “Div_XQuarter” rows return true. If yes, it will return true for the Div Quarter Column.

    def get_dividend_payout_quarter_df(self):
        """ Get the dividend payout quarter for each stock.
            Based on curr year -1 as guage.
            Append to the self.all_stock_consolidated_div_df
        """
        curr_yr, curr_mth = self.get_cur_year_mth()
        target_div_hist_df = self.all_stock_div_hist_df[(self.all_stock_div_hist_df['Div_year']== curr_yr-1)]
        def check_availiable1(s):
            for n in s.values:
                if n == True:
                    return True
            return False
        target_div_hist_df = target_div_hist_df.groupby('SYMBOL').agg(check_availiable1).reset_index()[['SYMBOL','Div_1stQuarter','Div_2ntQuarter','Div_3rdQuarter','Div_4thQuarter' ]]
        self.all_stock_consolidated_div_df = pandas.merge(self.all_stock_consolidated_div_df,target_div_hist_df, on = 'SYMBOL', how = 'left')

A sample of the output is as below. Some basic information is as followed. For the Stock OV8, it only pays out 2 years in last 4 years and the payout is twice (2nd and 3rd Quarter). The price is on the rise for the past 3 days. S58 is consistently paying out every year (NumYearPayin4yr =4)  with payout twice every year. Price is pretty consistent over the last 3 days.

SYMBOL NumDividendperYear NumYearPayin4Yr Div_1stQuarter Div_2ntQuarter \
0 OV8.SI 2 2 False True
1 S58.SI 2 4 True False

Div_3rdQuarter Div_4thQuarter
0 True False
1 True False

SYMBOL Trend_3_days_drop Trend_3_days_rise
0  OV8.SI             False              True
1  S58.SI             False             False

The full script can be found at GitHub.