Python

Basic Stock Technical Analysis with python

Simple technical analysis for stocks can be performed using the python pandas module with graphical display. Example of  basic analysis including simple moving averages, Moving Average Convergence Divergence (MACD) and Bollinger bands and width.

For the tech analysis to be performed, daily prices need to be collected for each stock. The Yahoo Finance API can retrieve the required data. The previous post described the method to link the YF API to python. After the historical prices are retrieved, the method for getting the various technical analysis can be easily done using the Pandas rolling mean method and plots can be done using Pandas plot function and additional help from Matplotlib.

Below is snippet of the script that initialize the hist data pulling and display the Bollinger Bands and Bollinger Width for a particular stock (Keppel Corp: BN4.SI).

import os, re, sys, time, datetime, copy, shutil
import pandas
from yahoo_finance_historical_data_extract import YFHistDataExtr
import matplotlib.pyplot as plt

if __name__ == '__main__':
        data_ext = YFHistDataExtr()
        data_ext.set_interval_to_retrieve(200)#in days
        data_ext.set_multiple_stock_list(['BN4.SI'])
        data_ext.get_hist_data_of_all_target_stocks()
        # convert the date column to date object
        data_ext.all_stock_df['Date'] =  pandas.to_datetime( data_ext.all_stock_df['Date'])
        temp_data_set = data_ext.all_stock_df.sort('Date',ascending = True ) #sort to calculate the rolling mean
       
        temp_data_set['20d_ma'] = pandas.rolling_mean(temp_data_set['Adj Close'], window=20)
        temp_data_set['50d_ma'] = pandas.rolling_mean(temp_data_set['Adj Close'], window=50)
        temp_data_set['Bol_upper'] = pandas.rolling_mean(temp_data_set['Adj Close'], window=20) + 2* pandas.rolling_std(temp_data_set['Adj Close'], 20, min_periods=20)
        temp_data_set['Bol_lower'] = pandas.rolling_mean(temp_data_set['Adj Close'], window=20) - 2* pandas.rolling_std(temp_data_set['Adj Close'], 20, min_periods=20)
        temp_data_set['Bol_BW'] = ((temp_data_set['Bol_upper'] - temp_data_set['Bol_lower'])/temp_data_set['20d_ma'])*100
        temp_data_set['Bol_BW_200MA'] = pandas.rolling_mean(temp_data_set['Bol_BW'], window=50)#cant get the 200 daa
        temp_data_set['Bol_BW_200MA'] = temp_data_set['Bol_BW_200MA'].fillna(method='backfill')##?? ,may not be good
        temp_data_set['20d_exma'] = pandas.ewma(temp_data_set['Adj Close'], span=20)
        temp_data_set['50d_exma'] = pandas.ewma(temp_data_set['Adj Close'], span=50)
        data_ext.all_stock_df = temp_data_set.sort('Date',ascending = False ) #revese back to original
        
        data_ext.all_stock_df.plot(x='Date', y=['Adj Close','20d_ma','50d_ma','Bol_upper','Bol_lower' ])
        data_ext.all_stock_df.plot(x='Date', y=['Bol_BW','Bol_BW_200MA' ])
        plt.show()

Bollinger Band of BN4

Generate NLP training sets using Google search module

In sentiment analysis or natural language processing, training sets are required to create the different classifiers in order to interpret phrases of words or assign appropriate sentiment features to particular phrases or texts . In general, the larger the training sets the higher the accuracy of the interpreted sentiment or results.

To produce a large training set, it is required to source manually large number of raw data and classifier them manually, which in turn, a tedious process. Google search results might be one alternative to collect the training sets which are already classified due to the defining boundaries set by the Google search keywords.

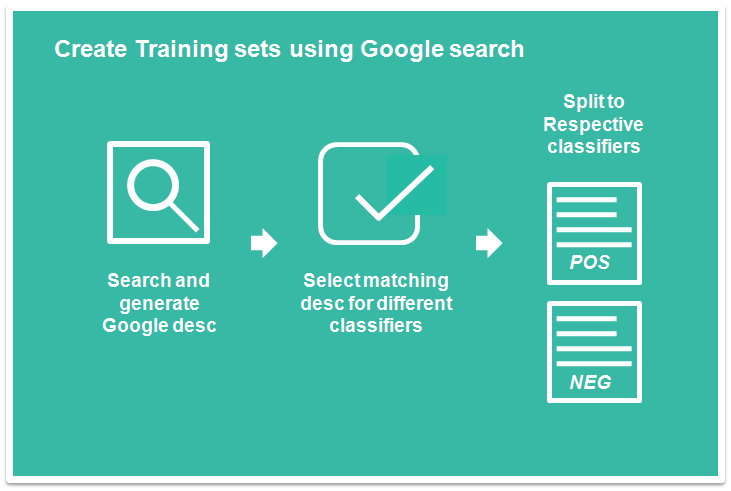
Hence, one of the way to create a large training set is to utilize the Google search module described in the previous post. We can input the description of the end target result (and hence, the classifier)  and the google search will return the brief description. The brief description will usually contain snippets of news/event relate up to the events or end results. These provide the basis for the classifier.

An example of such use will be to classify stocks news into positive news (that make stocks prices rise) or negative news (that cause stock prices to fall). For positive stock outlook we can use the following keywords”Shares rise by xxx” or “Price jump”, the Google search results will return all the contents or news that have the keywords. This will eventually provide all the positive sentiment phrases or news that will predict whether prices increase or fall. The following diagram simplify the procedure.

Creating Classifiers from Google Search

To make it easier for user to generate the classifier, a GUI function is created. Below GUI is generated using the wx,itempicker module. Users can input the google search texts (can have multiple entries separated by “;”) that will hint the classifiers and run the Google search and all the links results will be displayed on the left text box. The user can then proceed to select the items, After which all the items are selected, the user can proceed to save all the data in a file or copy to clipboard for further processing. While copying, it can append the classifier label to the sentences.

Classifer GUI

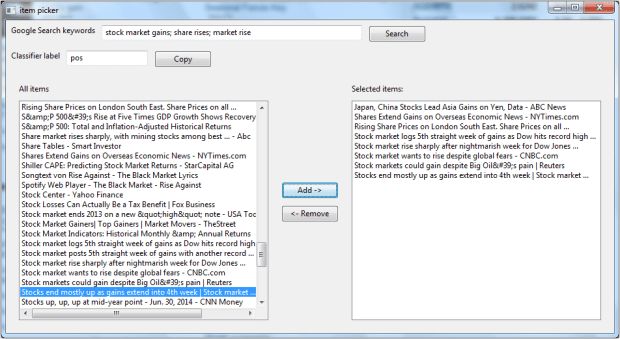
The final output are copied to clipboard. Below is the output. Note that commas except the classifier label parts are removed from the sentences.

Japan, China Stocks Lead Asia Gains on Yen Data – ABC News,pos
Shares Extend Gains on Overseas Economic News – NYTimes.com,pos
Rising Share Prices on London South East. Share Prices on all …,pos
Stock market logs 5th straight week of gains as Dow hits record high …,pos
Stock market rise sharply after nightmarish week for Dow Jones …,pos
Stock market wants to rise despite global fears – CNBC.com,pos
Stock markets could gain despite Big Oil’s pain | Reuters,pos
Stocks end mostly up as gains extend into 4th week | Stock market …,pos

Sample of the codes below. The code mainly used to define the various wx widgets. It requires the wx module and for the clipboard, it requires another script for the clipboard function. Alternatively, the copy function can be easily replaced by saving to target file or other storage.

import os, sys, time, datetime

## wx imports
import wx
from wx.lib.itemspicker import ItemsPicker,EVT_IP_SELECTION_CHANGED, IP_SORT_CHOICES
from wx.lib.itemspicker import IP_SORT_SELECTED,IP_REMOVE_FROM_CHOICES

## Google search module using python pattern
from Python_Google_Search_Retrieve import gsearch_url_form_class

## pyET_tools import, clipboard, for storing data to clipboard,
## can be substitued with alternative such as storing to file.
import pyET_tools.Clipboard_handler as Clip

class MyPanel(wx.Panel):
    def __init__(self,parent):
        wx.Panel.__init__(self,parent)
        self.parent = parent

        ## list of parameters
        self.google_results= []
        self.add_classifier_str = 'pos' # add either classifer pos or neg to the str\
        self.search_word_list = [] #
        self.picked_item_list = []

        ## wx widgets
        ## Top panel display sizer for google search keywords input
        ## Hold the search Enter box and button to execute the search
        ## keywords are entered in single box but separate by ;
        top_display_sizer = wx.BoxSizer(wx.HORIZONTAL)
        search_label = wx.StaticText(self, -1, "Google Search keywords")
        self.search_textbox = wx.TextCtrl(self, -1, size=(400, -1))
        search_btn = wx.Button(self, -1, "Search")
        search_btn.Bind(wx.EVT_BUTTON, self.OnSearch)
        top_display_sizer.Add(search_label, 0, wx.ALL, 5)
        top_display_sizer.Add(self.search_textbox, 0, wx.ALL, 5)
        top_display_sizer.Add(search_btn, 0, wx.ALL, 5)

        ## Mid panel sizer
        ## Hold the classifier label Enter box and also the button for copy data to clipboard
        ## The button can be modified to save the picked items.
        mid_display_sizer = wx.BoxSizer(wx.HORIZONTAL)
        classifier_label = wx.StaticText(self, -1, "Classifier label")
        copy_output_btn = wx.Button(self, -1, "Copy")
        copy_output_btn.Bind(wx.EVT_BUTTON, self.CopyPickedItems)
        self.classifier_textbox = wx.TextCtrl(self, -1, self.add_classifier_str, size=(125, -1))
        mid_display_sizer.Add(classifier_label,0, wx.ALL, 5)
        mid_display_sizer.Add(self.classifier_textbox, 0, wx.ALL, 5)
        mid_display_sizer.Add(copy_output_btn, 0, wx.ALL, 5)

        ## Main sizer
        ## Item picker widgets.
        main_sizer =wx.BoxSizer(wx.VERTICAL)
        main_sizer.Add(top_display_sizer, 0, wx.TOP|wx.LEFT, 3)
        main_sizer.Add(mid_display_sizer, 0, wx.TOP|wx.LEFT, 3)
        self.ip = ItemsPicker(self,-1, [], 'All items', 'Selected items:',ipStyle = IP_SORT_CHOICES)
        self.ip.Bind(EVT_IP_SELECTION_CHANGED, self.OnSelectionChange)
        self.ip._source.SetMinSize((-1,150))
        main_sizer.Add(self.ip, 1, wx.ALL|wx.EXPAND, 10)
        self.SetSizer(main_sizer)
        self.Fit()

    def OnSearch(self,e):
        """ Generate the list of google search results.
            Set the items on the left textctrl box.
        """
        gs_keywords_list = self.split_google_keywords()
        self.OnGoogleRun(gs_keywords_list)
        self.ip.SetItems(self.google_results)

    def split_google_keywords(self):
        """ Split the google keywords  based on ";" for multiple keywords entry.
            Returns:
                (list): list of keywords to be used.
                        Remove any empty words accidentially bound by ;
        """
        search_items =  self.search_textbox.GetValue()
        search_items_list = search_items.split(';')
        return [n for n in search_items_list if n!='']

    def append_classifier_to_text(self, selected_txt_list):
        """ Add the classifier to the selected text.
            Args:
                selected_txt_list (list): list of str that contains the selected text.
            Returns:
                (list): list with classifer text added. eg. ",pos"
        """
        return [n + ',' + self.add_classifier_str for n in selected_txt_list]

    def get_classifier_txt(self):
        """ Query and Set the classifier txt to self.add_classifier_str
            Query from the self.classifier_textbox.
        """
        self.add_classifier_str = self.classifier_textbox.GetValue()

    def CopyPickedItems(self,e):
        """ Copy the selected item to clipboard.
            Get all the items on the selected list, append the pos str and save to clipboard
        """
        ## get classifier text
        self.get_classifier_txt()

        ## get the picked items
        selected_txt_list = self.picked_item_list

        ## append classifier text to picked items
        selected_txt_list = self.append_classifier_to_text(selected_txt_list)

        ## copy the items to clipboard
        Clip.copy_list_to_clipbrd(selected_txt_list)

    def OnSelectionChange(self, e):
        """ Trigger for the item picker when items are being selected or picked.
            Set to self.picked_item_list.
        """
        self.picked_item_list =  e.GetItems()

    def OnGoogleRun(self, search_words):
        """ Run the google search results to get all the link

        """
        ## User options
        NUM_SEARCH_RESULTS = 50                # number of search results returned

        ## Create the google search class
        hh = gsearch_url_form_class(search_words)
        hh.print_parse_results = 0

        ## Set the results
        hh.set_num_of_search_results(NUM_SEARCH_RESULTS)
        hh.enable_sort_date_descending()# enable sorting of date by descending. --> not enabled

        ## Generate the Url list based on the search item
        url_list =  hh.formed_search_url()

        ## Parse the google page based on the url
        hh.parse_all_search_url()
        hh.consolidated_results()

        self.google_results = hh.merged_result_desc_list
        print 'End Search'

class MyFrame(wx.Frame):
    def __init__(self, parent, ID, title):
        wx.Frame.__init__(self, parent, ID, title,pos=(50, 150), size=(950, 520))#size and position
        self.top_panel = MyPanel(self)

class MyApp(wx.App):
    def __init__(self):
        wx.App.__init__(self,redirect =False)
        self.frame= MyFrame(None,wx.ID_ANY, "item picker")
        self.frame.Show()

def run():
    try:
        app = MyApp()
        app.MainLoop()
    except Exception,e:
        print e
        del app

if __name__== "__main__":
    run()

(more…)

Google Image Search with Python (part 1)

Google has a image  search feature that allows users to input a image and search for related web pages that embed the image (reverse image search). Google also shows related images that are similar to the targeted image.

There are multiple ways to input the image into Google search such as drag-and-drop to the search input box, upload the file or provide an url link of the image. Note that Google will store all the images that have been uploaded for its own internal use.

The project here will try to make use of the image url link to pull the Google results automatically. The overall flow is as below:

  1. Upload image to a fixed location that can provide a public link of the image url.
  2. Combined the image url to the Google image search url
  3. Google image search url is of the following format
  4. Scrape the Google Result page returned from the combined url for the results.

Item 1 is difficult as it would required a place to upload and store the new image and at the same time return the correct url. The concept is to use cloud storage such as Dropbox or BOX which allow public to view the file if provide the url link and at the same time acts as regular folder on the local computer.

This project will use BOX to perform item 1. It requires an BOX account and installation of BOX to local computer. After which, the following steps are required.

  1. Create a temp folder and a dummy image (.jpg)
  2. Note the image file name. This should not be changed as it will affect the final url.
  3. Copy the public link and paste to browser. The public link will be used in script for subsequent pulling.
  4. The browser will re-direct to the BOX image viewer. The manual way to retrieve the image url can be by right clicking on the image and select image url.
  5. The image will be of the following format.
  6. If the image is subsequently be overwritten, the filename should not change BUT the file_version  will be updated hence the url will change with the new file version (highlighted in blue)

The script for this part will be to automatically get the url from the BOX page given the public link. Note that inputting the url and direct scraping of the webpage will not get the image url as it need to wait for the javascript execution.

One way to overcome this is to use Selenium (Web browser Automation). This will automatically execute any Javascript and retrieved the final html of the page. With the final html, we can use the Python pattern DOM object to parse the image url.

Below is the class for the getting the image url to be inputted to Google search. For this post, only this portion is displayed.

import re, os, sys, math, time, datetime, shutil
from pattern.web import URL, DOM, plaintext, extension, Element, find_urls
from contextlib import closing
from selenium.webdriver import Firefox
from selenium.webdriver.support.ui import WebDriverWait

class BoxImageUrl(object):
    """ Fetch the url of a public share link pic.
        Can write a image to that particular file and get the latest url of that file
        Need to wait for sometime for the image to load --> can use before and after to see any chnage in the words
        Need to wait for the box image to load up.

        Note:
        self.share_folder_url  --> public folder link of BOX. Set by user.
        self.local_image_store_path --> placeholder for all new image. All new image is to overwrite this file.
                                        Set by user.

    """
    def __init__(self):
        ## url parametesr
        self.share_folder_url = 'https://app.box.com/s/jlwchpjfcpueq1gshij7' #use to go to box to get the image url
        self.box_image_full_url = ''
        self.box_image_start_url = 'https://app.box.com/representation/file_version_'
        self.box_image_end_url =''

        ## local placeholder location.
        self.local_image_store_path = r'C:\Users\Tan Kok Hua\Box Sync\temp\stock2.jpg'
        self.image_version = '0' #current version that exists
        self.image_version_history = '0' # Use to check version or whether file has already uploaded.

        ## general use
        self.dom_object = object()

        ## Error/ debug / monitor
        self.url_query_timeout = 0
        self.new_image_upload_check_cntdn = 10 # number of times before the while loop break for checking.

    def set_box_public_link_of_image(self, image_public_link):
        """ Set the public link of image based on BOX.
            To get the public link. Go to Box Sync folder, navigate to image, right click and select Share Box link.
            Args:
                image_public_link (str): http string of the image public link.
       """
        self.share_folder_url = image_public_link

    def fetch_image_url_fr_box(self):
        """ Fetch Image url for Box.com.
            Set to self.image_url.
            Make use of selenium.

        """
        with closing(Firefox()) as browser:
             browser.get(self.share_folder_url)
             time.sleep(3)
             page_source = browser.page_source

        self.set_box_image_end_url(page_source)
        self.set_final_image_box_url()

    def set_box_image_end_url(self, box_page_source):
        """ From the box page source, get the box_image end url.
            Note the image version number will change with each upload of the same filename.
            Args:
                box_page_source (str): source in html.
            Returns:
                (str): inside file_version_x where x is the digit str required.
        """
        dom = DOM(box_page_source)

        ## pic will be in the img tag. For box only one img tag return
        img_element = dom("img")[0]
        ## text str will be inside this attribute or the img tag --> src.
        ## encode to get rid of the unicode
        txt_str = img_element.attributes['src'].encode()
        ## Get the image version --> mainly to use whether the image is already uploaded.
        self.image_version = re.search('file_version_(.*)/image', txt_str).group(1)
        ## extract the file version from the text str.
        self.box_image_end_url = re.search('file_version_(.*)', txt_str).group(1)

    def set_final_image_box_url(self):
        """ Get final image box url by joining the start and end url.

        """
        self.box_image_full_url = self.box_image_start_url + self.box_image_end_url

    def set_image_version_history(self):
        """ Set the image version history by scanning the website before uploading new image.
        """
        self.fetch_image_url_fr_box() # will also set the image version history
        self.image_version_history = self.image_version
        print 'Image version history', self.image_version_history

    def upload_new_image(self, target_image_path):
        """ Move the target image to the place holder defined by self.local_image_store_path
            Args:
                target_image_path (str): file path of image to be searched.
        """
        print 'uploading images'
        shutil.copy2(target_image_path, self.local_image_store_path)
        if self.has_img_uploaded():
            print 'Successful'
        else:
            print 'new image not found'

    def has_img_uploaded(self):
        """ Checked whether image has uploaded by repeatly calling the image url get.
            if self.image_version_history is changed.

        """
        for n in range(self.new_image_upload_check_cntdn):
            time.sleep(10)
            self.fetch_image_url_fr_box()
            if not self.image_version == self.image_version_history:
                ## means new version already uploaded
                return True
        return False

if __name__ == '__main__':
    choice  = 3

    if choice ==3:
        ## initialize the class
        hh = BoxImageUrl()

        ## Set the image public link from the BOX sync folder
        hh.set_box_public_link_of_image('https://app.box.com/s/jlwchpjfcpueq1gshij7')

        ## Go the public link and get the previous true image url.
        ## As the image file is continuously upload with new image, this is used to check for version.
        hh.set_image_version_history()

        ## Upload the new image to perform the google search.
        ## Time is allocated for the image to upload fully by monitoring the change in file version.
        hh.upload_new_image(r'C:\data\temp\person.jpg')

        ## Latest image url is obtained. This will eventually pass to google for image search.
        print hh.box_image_full_url

Getting historical stock quotes and dividend Info using python

The previous post describes getting stock information using python and Yahoo Finance API. This post continues to add more information using the YF API. The additional information focus on historical price trend and dividend information. The dividend information (payout consistency, date etc) are particular useful as they are not easily available for scraping.

The same concept applies here in getting the hist price and dividend information as in the previous post. First is the construction of the respective urls, then use python PATTERN module to download the .csv and finally use Pandas  to combine all the information.

The url for the hist price and dividend information are very similar. For the url formation of the hist price, it is as follows:

http://ichart.yahoo.com/table.csv?s=S58.SI&c=2009&a=9&b=23&f=2014&d=9&e=22&g=d&ignore=.csv

The blue part is the stock symbol (only one symbol can be run at a time), the pink and green portion represent the start and end date respectively. The brown portion is the interval in d,m, y. By changing the interval g = v, the dividend information as in the dividend payout at the particular date is given. The url str is as below.

http://ichart.yahoo.com/table.csv?s=S58.SI&c=2009&a=9&b=23&f=2014&d=9&e=22&g=v&ignore=.csv

For the script, the interval is easily set by using the following part of the code. The formation of url will straight away append the hist price url and dividend url in a single function.

    def set_interval_to_retrieve(self, days):
        """ Set the interval (num of days) to retrieve.
            Args:
                days (int): Number of days from current date to retrieve.
        """
        self.date_interval = days
    def calculate_start_and_end_date(self):
        """ Return the start and end (default today) based on the interval range in tuple.
            Returns:
                start_date_tuple : tuple in yyyy mm dd of the past date
                end_date_tuple : tupe in yyyy mm dd of current date today
        """
        ## today date or end date
        end_date_tuple = datetime.date.today().timetuple()[0:3] ## yyyy, mm, dd
        start_date_tuple = (datetime.date.today() - datetime.timedelta(self.date_interval)).timetuple()[0:3]
        return start_date_tuple, end_date_tuple

    def form_hist_quotes_date_interval_portion_url(self):
        """ Form the date interval portion of the url
            Set to self.hist_quotes_date_interval_portion_url
            Note: add the number of the month minus 1.
        """
        start_date_tuple, end_date_tuple = self.calculate_start_and_end_date()

        from_date_url_str = '&c=%s&a=%s&b=%s' %(start_date_tuple[0],start_date_tuple[1]-1, start_date_tuple[2])
        end_date_url_str = '&f=%s&d=%s&e=%s' %(end_date_tuple[0],end_date_tuple[1]-1, end_date_tuple[2])
        interval_str = '&g=d'
        dividend_str = '&g=v'

        self.hist_quotes_date_interval_portion_url = from_date_url_str + end_date_url_str + interval_str
        self.hist_quotes_date_dividend_portion_url = from_date_url_str + end_date_url_str + dividend_str

For the hist stock data part, the current script only retrieve the past 3 days behaviour of a particular stock. It will show whether a stock is continuously rising or falling  for the past 3 days. It simply compares the 3 day prices to see if the prices get lower or higher with each coming day. This script is limited in the aspect that it cater for only 3 days running. There is room to improve upon this aspect.

For the dividend part, it is more interesting. It will retrieve information on whether the stock have been continuing giving out dividends every year for the past four years. It will also display the number of times each year the dividends are given out. In addition, it also provides the quarter (calender year) in which the dividends are given out based on past year.

Below are the parts of the code that capture the dividends information. It make uses of the pandas Data frame. First, several columns are added for easy processing. The dates are split to year and month columns for easier date processing. In addition, the dividend months are identified for each payout and classified to specific quarters.

    def insert_yr_mth_col_to_div_df(self):
        """ Insert the year and month of dividend to div df.
            Based on the self.all_stock_div_hist_df["Date"] to get the year and mth str.
            Set back to self.all_stock_div_hist_df
        """
        self.all_stock_div_hist_df['Div_year'] = self.all_stock_div_hist_df['Date'].map(lambda x: int(x[:4]))
        self.all_stock_div_hist_df['Div_mth'] = self.all_stock_div_hist_df['Date'].map(lambda x: int(x[6:7]))

    def insert_dividend_quarter(self):
        """ Insert the dividend quarter. Based on Calender year.
        """

        #combined all the div mth??
        self.all_stock_div_hist_df['Div_1stQuarter'] = self.all_stock_div_hist_df['Div_mth'].isin([1,2,3,])
        self.all_stock_div_hist_df['Div_2ntQuarter'] = self.all_stock_div_hist_df['Div_mth'].isin([4,5,6])
        self.all_stock_div_hist_df['Div_3rdQuarter'] = self.all_stock_div_hist_df['Div_mth'].isin([7,8,9])
        self.all_stock_div_hist_df['Div_4thQuarter'] = self.all_stock_div_hist_df['Div_mth'].isin([10,11,12])

The next part focus on deciding whether the stock has been consistently giving out dividend for the past four years (Need to adjust the date if wish to set to longer periods.). The script will first filter the information so that the data only contain information for past 4 years. Using Pandas Groupby function, it will group the raw data by stock by year. It will count the number of year exist for the stock. If the stock has been giving out dividends yearly, it will count 4 which is one for each year. Using the aggregation “mean”, it will also calculate on average number of times the payout per year.

    def get_num_div_payout_per_year(self):
        """ Get the number of div payout per year, group by symbol and year.
            Exclude the curr year information.
        """
        curr_yr, curr_mth = self.get_cur_year_mth()

        ## exclude the current year as dividend might not have pay out yet and keep within 4 years period
        target_div_hist_df = self.all_stock_div_hist_df[~(self.all_stock_div_hist_df['Div_year']== curr_yr)]
        target_div_hist_df = target_div_hist_df[target_div_hist_df['Div_year']>= curr_yr-4]

        ## get the div payout each year in terms of count
        div_cnt_df =  target_div_hist_df.groupby(['SYMBOL', 'Div_year']).agg("count").reset_index()
        div_payout_df = div_cnt_df.groupby('SYMBOL').agg('mean').reset_index()[['SYMBOL','Dividends']].rename(columns = {'Dividends':'NumDividendperYear'})

        ## get the number of years div pay for 4 year period --4 means every year.
        div_cnt_yr_basis_df = div_cnt_df.groupby('SYMBOL').agg('count').reset_index()[['SYMBOL','Div_year']].rename(columns = {'Div_year':'NumYearPayin4Yr'})

        ## join the data frame
        self.all_stock_consolidated_div_df = pandas.merge(div_payout_df,div_cnt_yr_basis_df, on = 'SYMBOL')

The last part focus on the quarter in which dividend payout resides. It will first filter out data by last year only. Then, it will group the data by Symbol and iterate over the rows to see the four “Div_XQuarter” rows return true. If yes, it will return true for the Div Quarter Column.

    def get_dividend_payout_quarter_df(self):
        """ Get the dividend payout quarter for each stock.
            Based on curr year -1 as guage.
            Append to the self.all_stock_consolidated_div_df
        """
        curr_yr, curr_mth = self.get_cur_year_mth()
        target_div_hist_df = self.all_stock_div_hist_df[(self.all_stock_div_hist_df['Div_year']== curr_yr-1)]
        def check_availiable1(s):
            for n in s.values:
                if n == True:
                    return True
            return False
        target_div_hist_df = target_div_hist_df.groupby('SYMBOL').agg(check_availiable1).reset_index()[['SYMBOL','Div_1stQuarter','Div_2ntQuarter','Div_3rdQuarter','Div_4thQuarter' ]]
        self.all_stock_consolidated_div_df = pandas.merge(self.all_stock_consolidated_div_df,target_div_hist_df, on = 'SYMBOL', how = 'left')

A sample of the output is as below. Some basic information is as followed. For the Stock OV8, it only pays out 2 years in last 4 years and the payout is twice (2nd and 3rd Quarter). The price is on the rise for the past 3 days. S58 is consistently paying out every year (NumYearPayin4yr =4)  with payout twice every year. Price is pretty consistent over the last 3 days.

SYMBOL NumDividendperYear NumYearPayin4Yr Div_1stQuarter Div_2ntQuarter \
0 OV8.SI 2 2 False True
1 S58.SI 2 4 True False

Div_3rdQuarter Div_4thQuarter
0 True False
1 True False

SYMBOL Trend_3_days_drop Trend_3_days_rise
0  OV8.SI             False              True
1  S58.SI             False             False

The full script can be found at GitHub.


Filter stocks data using python

After retrieving the various stocks information from yahoo finance etc with tools described in the previous blog post, it is more meaningful to filter stocks that meet certain requirements much like the functionality of  the Google stocks screener.

The script (avaliable in GitHub) will take in a text file with the criteria specified and filter them using python Pandas. The text file is in the format such that users can easily input and retrieve the criteria description using the DictParser module described in the following blog post. In addition, the DictParser module make it easy to create the respective criteria. A sample of a particular criteria file is as below.

$greater
Volume:999999
PERATIO:4
Current Ratio (mrq):1.5
Qtrly Earnings Growth (yoy):0
DilutedEPS:0

$less
PERATIO:17
Mean Recommendation (this week):3

$compare
1:YEARHIGH,OPEN,greater,0

The DictParser object will get 3 dict based on above criteria text file. These are criteria that will filter the stocks that meet the listed requirements. The stock data after retrieved (in the form of .csv) are converted to Pandas Dataframe object for easy filtering and the stocks eventually selected will  match all the criteria within each criteria file.

Under the ‘greater’ dict, each of the key value pair mean that only stocks that have the key (eg Volume) greater than the value (eg 999999) will be selected. Under the “less” dict, only stocks that have key less than the corresponding value will be selected.  For the “compare” dict, it will not make use of the key but utilize the value (list) for each key.

Inside the value list of the “compare”, there will be 4 items. It will compare the first to second item with 3rd item as comparator and last item as the value. For example, the phrase “YEARHIGH,OPEN,greater,0” will scan stock that has “YearHigh” price greater than “open” price by at least 0 which indicates all stocks will be selected based on this particular criteria.

Users can easily add or delete criteria by conforming to the format. The script allows several criteria files to be run at one go so users can create multiple criteria files with each catering to different risk appetite as in the case of stocks. Below is part of the script that show getting the different criteria dicts using the DictParser and using the dict to filter the data.


    def get_all_criteria_fr_file(self):
        """ Created in format of the dictparser.
            Dict parser will contain the greater, less than ,sorting dicts for easy filtering.
            Will parse according to the self.criteria_type

            Will also set the output file name
        """
        self.dictparser = DictParser(self.criteria_type_path_dict[self.criteria_type])
        self.criteria_dict = self.dictparser.dict_of_dict_obj
        self.modified_df = self.data_df

        self.set_output_file()

    def process_criteria(self):
        """ Process the different criteria generated.
            Present only have more and less
        """
        greater_dict = dict()
        less_dict = dict()
        compare_dict = dict()
        print 'Processing each filter...'
        print '-'*40

        if self.criteria_dict.has_key('greater'): greater_dict =  self.criteria_dict['greater']
        if self.criteria_dict.has_key('less'): less_dict =  self.criteria_dict['less']
        if self.criteria_dict.has_key('compare'): compare_dict =  self.criteria_dict['compare']

        for n in greater_dict.keys():
            if not n in self.modified_df.columns: continue #continue if criteria not found
            self.modified_df = self.modified_df[self.modified_df[n] > float(greater_dict[n][0])]
            if self.print_qty_left_aft_screen:
                self.__print_criteria_info('Greater', n)
                self.__print_modified_df_qty()

        for n in less_dict.keys():
            if not n in self.modified_df.columns: continue #continue if criteria not found
            self.modified_df = self.modified_df[self.modified_df[n] < float(less_dict[n][0])]
            if self.print_qty_left_aft_screen:
                self.__print_criteria_info('Less',n)
                self.__print_modified_df_qty()

        for n in compare_dict.keys():
            first_item = compare_dict[n][0]
            sec_item = compare_dict[n][1]
            compare_type = compare_dict[n][2]
            compare_value = float(compare_dict[n][3])

            if not first_item in self.modified_df.columns: continue #continue if criteria not found
            if not sec_item in self.modified_df.columns: continue #continue if criteria not found

            if compare_type == 'greater':
                self.modified_df = self.modified_df[(self.modified_df[first_item] - self.modified_df[sec_item])> compare_value]
            elif compare_type == 'less':
                self.modified_df = self.modified_df[(self.modified_df[first_item] - self.modified_df[sec_item])< compare_value]

            if self.print_qty_left_aft_screen:
                self.__print_criteria_info('Compare',first_item, sec_item)
                self.__print_modified_df_qty()

        print 'END'
        print '\nSnapshot of final df ...'
        self.__print_snapshot_of_modified_df()

Sample output from one of the criteria is as shown below. It try to screen out stocks that provide high dividend and yet have a good fundamental (only basic parameters are listed below). The modified_df_qty will show the number of stocks left after each criteria.

 List of filter for the criteria:  dividend
—————————————-
VOLUME  >  999999
Qtrly Earnings Growth (yoy)  >  0
DILUTEDEPS  >  0
DAYSLOW  >  1.1
TRAILINGANNUALDIVIDENDYIELDINPERCENT  >  4
PERATIO  <  15
TrailingAnnualDividendYieldInPercent  <  10

Processing each filter…
—————————————-
Current Screen criteria:  Greater   VOLUME
Modified_df qty:  53
Current Screen criteria:  Greater   Qtrly Earnings Growth (yoy)
Modified_df qty:  48
Current Screen criteria:  Greater   DILUTEDEPS
Modified_df qty:  48
Current Screen criteria:  Greater   DAYSLOW
Modified_df qty:  24
Current Screen criteria:  Greater   TRAILINGANNUALDIVIDENDYIELDINPERCENT
Modified_df qty:  5
Current Screen criteria:  Less   PERATIO
Modified_df qty:  4
END

Snapshot of final df …
Unnamed: 0   SYMBOL              NAME LASTTRADEDATE    OPEN  \
17            4   O39.SI         OCBC Bank     10/3/2014   9.680
21            8   BN4.SI       Keppel Corp     10/3/2014  10.380
37            5  C38U.SI  CapitaMall Trust     10/3/2014   1.925
164          14   U11.SI               UOB     10/3/2014  22.300

PREVIOUSCLOSE  LASTTRADEPRICEONLY   VOLUME  AVERAGEDAILYVOLUME  DAYSHIGH  \
17           9.710               9.740  3322000             4555330     9.750
21          10.440              10.400  4280000             2384510    10.410
37           1.925               1.925  5063000             7397900     1.935
164         22.270              22.440  1381000             1851720    22.470

…     Mean Recommendation (last week)  \
17     …                                 2.6
21     …                                 2.1
37     …                                 2.5
164    …                                 2.8

Change  Mean Target  Median Target  \
17                                 0.0        10.53          10.63
21   <font color=”#cc0000″>-0.1</font>        12.26          12.50
37                                 0.1         2.14           2.14
164                                0.0        24.03          23.60

High Target Low Target  No. of Brokers            Sector  \
17         12.23       7.96              22         Financial
21         13.50      10.00              23  Industrial Goods
37          2.40       1.92              21         Financial
164        26.80      22.00              23         Financial

Industry                                       company_desc
17    Money Center Banks  Oversea-Chinese Banking Corporation Limited of…
21   General Contractors  Keppel Corporation Limited primarily engages i…
37         REIT – Retail  CapitaMall Trust (CMT) is a publicly owned rea…
164   Money Center Banks  United Overseas Bank Limited provides various …

[4 rows x 70 columns]

Google Search results web crawler (re-visit Part 2)

Added 2 new features to Google search results web crawler. This is continuation of previous work on web crawler with Pattern. The script can be found at GitHub.

The first feature is to return the google search results sorted by date relevance. To turn on the date filter manually in google search, the following url string (“&as_qdr=d“) is appended. The following website provide more information on this. For the script based crawler, the url string to be appended is “&tbs=qdr:d,sbd:1” which will sort the date in descending, i.e, the most current date first.

The 2nd feature is the enable_results_converging options where it will merge all results from a list of keyword search. The merging is such that the top results from each search keyword are grouped together, i.e, it will list all the #1 search together followed by the #2 and so forth.

A sample run of the script is as below. The date filtered is turn off in this case. The example focus on fetching all the news from a particular stock “Sheng Siong” by searching for multiple keywords. It is assumed the most relevant are grouped at the top list hence consolidating all the same ranked results will provide more useful information.

        print 'Start search'

        ## User options
        NUM_SEARCH_RESULTS = 5                # number of search results returned 
        search_words = ['Sheng Siong buy' , 'Sheng Siong sell', 'Sheng Siong sentiment', 'Sheng Siong stocks review', 'Sheng siong stock market']  # set the keyword setting
        ## Create the google search class
        hh = gsearch_url_form_class(search_words)

        ## Set the results
        hh.set_num_of_search_results(NUM_SEARCH_RESULTS)
        #hh.enable_sort_date_descending()# enable sorting of date by descending. --> not enabled

        ## Generate the Url list based on the search item
        url_list =  hh.formed_search_url()

        ## Parse the google page based on the url
        hh.parse_all_search_url()
        hh.consolidated_results()
        
        print 'End Search'

Top 5 Output are displayed as below. The link from google results + the descriptions are printed. Note that there are repeated entry as there are some keywords that return the exact website. Further work is on-going to remove the duplicates.

================
Results

=================

link: http://www.shengsiong.com.sg/
Description:
Sheng Siong
****
link: http://www.shengsiong.com.sg/
Description:
Sheng Siong
****
link: http://www.sharejunction.com/sharejunction/listMessage.htm%3FtopicId%3D10021%26msgbdName%3DSheng%2520Siong%26topicTitle%3DSheng%2520Siong
Description:
ShareJunction – Stock Forum Messages : Sheng Siong
****
link: https://sg.finance.yahoo.com/echarts%3Fs%3DOV8.SI
Description:
Sheng Siong Share Price Chart | OV8.SI – Yahoo! Singapore Finance
****
link: http://sbr.com.sg/source/motley-fool-singapore/here-are-5-things-you-should-know-about-sheng-siong
Description:
Here are 5 things you should know about Sheng Siong | Singapore …
****
link: Sheng+Siong+buy&amp;hq=Sheng+Siong+buy&amp;hnear=0x31da1767b42b8ec9:0x400f7acaedaa420,Singapore
Description:
Local business results for Sheng Siong buy near Singapore
****

Further works include scraping the individual sites for more details much like what is done in the post with Scrapy. The duplicates entries will also be addressed.

Direct Scraping Stock Data from Yahoo Finance

The previous post on scraping finance data from yahoo finance uses  Yahoo Finance API to retrieve stocks data in the form of csv file. However, this is limited to the properties or the extent of data the API is able to provide. In order to retrieve more data such as analyst opinion or company basic summary, it is required to scrape the website directly.

The following script will be able to scrape the information that the  Yahoo Finance API is not able to provide. It makes use of the PATTERN module web dom and css selector object/function. For now, the script is able to scrape the analyst opinion, company key statistics (not found in yahoo API) such as debt, current ratio, type of industry and finally the company desc. The same concept can be applied to other desired data.

The class in the script go through a series of steps as described. For a series of stocks symbol, scan through all the URLs given and scrape the page for required information. The class will have three dictionaries. The first is the start URLs to combine with the stock symbol for query, the CSS selector used for retrieving the parameters required and lastly the dict containing the method of parsing for each of the URL. Append the results for each symbol and return as combined Pandas data frame which can be used to join to other data set. Below is the snapshot of the different dictionaries described above.

        ## Dict for different type of parsing. Starl url will differ.
        self.start_url_dict = {
                                'Company_desc': 'http://finance.yahoo.com/q?',
                                'analyst_opinion':'http://finance.yahoo.com/q/ao?',
                                'industry':'https://sg.finance.yahoo.com/q/in?',
                                'key_stats': 'https://sg.finance.yahoo.com/q/ks?',
                              }

        ## CSS selector for dom objects mainly for parsing the results.
        self.css_selector_dict = {
                                'Company_desc': 'div#yfi_business_summary div[class="bd"]',
                                'analyst_opinion':['td[class="yfnc_tablehead1"]','td[class="yfnc_tabledata1"]'], # analyst -- header, data str
                                'industry':['th[class="yfnc_tablehead1]','td[class="yfnc_tabledata1]'],
                                'key_stats':['td[class="yfnc_tablehead1]','td[class="yfnc_tabledata1]'],
                                 }

        ## Method select detection
        self.parse_method_dict = {
                                'Company_desc': self.parse_company_desc,
                                'analyst_opinion': self.parse_analyst_opinion,
                                'industry': self.parse_industry_info,
                                'key_stats': self.parse_key_stats,
                                 }

The full script, together with the YF API scraping, can be found at GitHub.

Getting Google Search results with python (re-visit)

Below is an alternative to getting Google search results with Scrapy.  As Scrapy installaton on windows as well as the dependencies may pose an issue, this alternative make use of the more lightweight crawler known as Pattern. Unlike the scrapy version, this require only Pattern module as dependency. The script can be found at GitHub.

Similar to the previous Scrapy post, it focus on scraping the links from the Google main page based on the search keyword input. For this script, it will also retrieve the basic description generated by Google. The advantage of this script is that it can search multiple keywords at the same time and return a dict containing all the search key as keys and result links and desc as value. This enable more flexibility in handling the data.

It works in similar fashion to the Scrapy version by first forming the url and use the Pattern DOM object to retrieve the page url and parse the link and desc. The parsing method is based on the CSS selectors provided by the Pattern module.

    def create_dom_object(self):
        """ Create dom object based on element for scraping
            Take into consideration that there might be query problem.

        """
        try:
            url = URL(self.target_url_str)
            self.dom_object = DOM(url.download(cached=True))
        except:
            print 'Problem retrieving data for this url: ', self.target_url_str
            self.url_query_timeout = 1

    def parse_google_results_per_url(self):
        """ Method to google results of one search url.
            Have both the link and desc results.
        """
        self.create_dom_object()
        if self.url_query_timeout: return

        ## process the link and temp desc together
        dom_object = self.tag_element_results(self.dom_object, 'h3[class="r"]')
        for n in dom_object:
            ## Get the result link
            if re.search('q=(.*)&(amp;)?sa',n.content):
                temp_link_data = re.search('q=(.*)&(amp;)?sa',n.content).group(1)
                print temp_link_data
                self.result_links_list_per_keyword.append(temp_link_data)

            else:
                ## skip the description if cannot get the link
                continue

            ## get the desc that comes with the results
            temp_desc = n('a')[0].content
            temp_desc = self.strip_html_tag_off_desc(temp_desc)
            print temp_desc
            self.result_desc_list_per_keyword.append(temp_desc)
            self.result_link_desc_pair_list_per_keyword.append([temp_link_data,temp_desc])
            print

A sample run of the script is as below:

        ## User options
        NUM_SEARCH_RESULTS = 5                # number of search results returned
        search_words = ['tokyo go', 'jogging']  # set the keyword setting

        ## Create the google search class
        hh = gsearch_url_form_class(search_words)

        ## Set the results
        hh.set_num_of_search_results(NUM_SEARCH_RESULTS)

        ## Generate the Url list based on the search item
        url_list =  hh.formed_search_url()

        ## Parse the google page based on the url
        hh.parse_all_search_url()

        print 'End Search'

Output is as below:

================
Results for key: tokyo go

=================
http://www.youtube.com/watch%3Fv%3DwLgSbo0YsN8
Tokyo Go | A Mickey Mouse Cartoon | Disney Shows – YouTube

http://www.gotokyo.org/en/
Home / Official Tokyo Travel Guide GO TOKYO

http://disney.wikia.com/wiki/Tokyo_Go
Tokyo Go – DisneyWiki

http://video.disney.com/watch/disneychannel-tokyo-go-4e09ee61b04d034bc7bcceeb
Tokyo Go | Mickey Mouse and Friends | Disney Video

http://www.imdb.com/title/tt2992228/
&quot;Mickey Mouse&quot; Tokyo Go (TV Episode 2013) – IMDb

================
Results for key: jogging

================
http://en.wikipedia.org/wiki/Jogging
Jogging – Wikipedia, the free encyclopedia

jogging&amp;num=100&amp;client=firefox-a&amp;rls=org.mozilla:en-US:official&amp;channel=fflb&amp;ie=UTF-8&amp;oe=UTF-8&amp;prmd=ivns&amp;source=univ&amp;tbm=nws&amp;tbo=u
News for jogging

jogging&amp;oe=utf-8&amp;client=firefox-a&amp;num=100&amp;rls=org.mozilla:en-US:official&amp;channel=fflb&amp;gfe_rd=cr&amp;hl=en
Images for jogging

http://www.wikihow.com/Start-Jogging
How to Start Jogging: 7 Steps (with Pictures) – wikiHow

http://www.medicinenet.com/running/article.htm
Running: Learn the Facts and Risks of Jogging as Exercise

Extracting stocks info from yahoo finance using python (Updates)

Have made several updates to the script from previous posting. Firstly is the capability to sweep through all the stocks symbol for a .csv file. The list of stocks symbol is easily generated using the extract all symbol script describe in the previous post. Reading all the symbols from the CSV can be done using python Pandas as shown below.

        data_ext = YFinanceDataExtr()
        ## read  data from .csv file -- full list of stocks
        csv_fname = r'C:\pythonuserfiles\yahoo_finance_data_extract\stocklist.csv'
        stock_list = pandas.read_csv(csv_fname)
        # convert from pandas dataframe object to list
        stock_list = list(stock_list['SYMBOL'])
        #stock_list = ['S58.SI','S68.SI']
        data_ext.get_cur_quotes_fr_list(stock_list)

The second improvement is instead of keying all the individual properties that need to be extracted (as illustrated below), the list of properties can be read from a xls table using the xls_table_extract_module described in the following post.

original method to set the property in the url

    def form_cur_quotes_property_url_str(self):
        """ To form the properties/parameters of the data to be received for current quotes
            To eventually utilize the get_table_fr_xls.
            Current use default parameters.
            name(n0), symbol(s), the latest value(l1), open(o) and the close value of the last trading day(p)
            volumn (v), year high (k), year low(j)

            Further info can be found at : https://code.google.com/p/yahoo-finance-managed/wiki/enumQuoteProperty
        """
        start_str = '&f='
        target_properties = 'nsl1opvkj'
        self.cur_quotes_property_portion_url =  start_str + target_properties

 New method: xls table format. (the xls illustrated here is the simplified version). The full property xls is in Github.

stockproperty

The data can be retrieved easily using the xls_table_extract_module hence easily forming the properties str by concat the tag together. The information required can be customized to the order based on the order of xls and the information required can be turned on and off using the comment tag ‘#’.  Note  some of the properties retrieved might not be in format that easy to parse and might result in extra column upon downloading. The portion of script to handle this is as described below.

    def form_cur_quotes_property_url_str_fr_excel(self):
        """ Required xls_table_extract_module.
            Get all the properties from excel table.
            Properties can be selected by comment out those properties not required.
            Also set the heeader: self.cur_quotes_parm_headers for the values.

        """
        from xls_table_extract_module import XlsExtractor
        self.xls_property_data = XlsExtractor(fname = self.properties_excel_table, sheetname= 'Sheet1',
                                             param_start_key = 'stock_property//', param_end_key = 'stock_property_end//',
                                             header_key = '', col_len = 2)

        self.xls_property_data.open_excel_and_process_block_data()

        ## form the header
        self.cur_quotes_parm_headers = [n.encode() for n in self.xls_property_data.data_label_list]

        ## form the url str
        start_str = '&f='
        target_properties = ''.join([n[0].encode().strip() for n in self.xls_property_data.data_value_list])
        self.cur_quotes_property_portion_url =  start_str + target_properties

The last update enable the script to handle more than one url query (each query can handle up to 50 stocks). This enable the full sweep of all the stocks listed in the stocklist and downloaded it to single results file. A sweep of around 1000 stocks symbol take less than 3 mins (it also depends on the internet connection).

The updated script can be found at GitHub.

Manage and extract data using python and Excel tables

User data such as setting parameters are usually stored in txt, json or perhaps .csv format. One alternative to the common types of storing simple data sets used for initial settings is through using  Excel tables. Excel represents a good way to store and view tables with the extensive formatting options and  different tabs for multiple storage. This provides an edge over txt or other simple data storing. The only difficulty might be that it is not easy to retrieve the data easily unlike in .csv or txt file.

The script below will utilize the Excel tables to extract various information such as setting files, parameters values and at the same time maintain a neat way of viewing and changing all the parameters.

The script will required pyExcel which is interface module between python and excel. The concept is to retrieve all the tables and rows specified within the start and closing tag.

The advantages are:

  1. Multiple tags can be used within the same excel sheet or other excel sheets as well.
  2. Number of columns can be edited easily.
  3. Space can be inserted between rows for easy viewing.
  4. Comment can be inserted so that particular row data can be easily bypassed.
  5. Normal excel formatting can be enabled without disruption to the data retrieved hence allowing easy viewing of data.

Below is a sample table which data will be extracted to be use in subsequent python functions or modules. Note the formatting is up to the user preferences.

sample table

The script run and output are as below. Note that there are various output format to query from. Also notice that the space between the data and those commented rows are being taken care off. The script is available in GitHub.

        xls_set_class = XlsExtractor(fname = r'C:\Python27\Lib\site-packages\excel_table_extract\testset.xls', sheetname= 'Sheet1',
                                     param_start_key = 'start//', param_end_key = 'end//',
                                     header_key = 'header#3//', col_len = 3)
        xls_set_class.open_excel_and_process_block_data()

        print xls_set_class.data_label_list
        ## >>> [u'label1', u'label3']

        print xls_set_class.data_value_list
        ## >>> [[2.0, 3.0], [8.0, 9.0]]

        print xls_set_class.label_value_dict
        ## >>> {u'label1': [2.0, 3.0], u'label3': [8.0, 9.0]}

        print xls_set_class.header_list
        ## >>> [u'header1', u'header2', u'header3']